Now, whether you have a Chamberlain, LiftMaster, or Genie system, getting that control panel synced up isn’t as hard as it sounds. In this article, I’ll walk you through everything you need to know, from the initial setup to troubleshooting common issues. Grab a cup of coffee and let’s dive in!
Understanding Your Overhead Door Control Panel
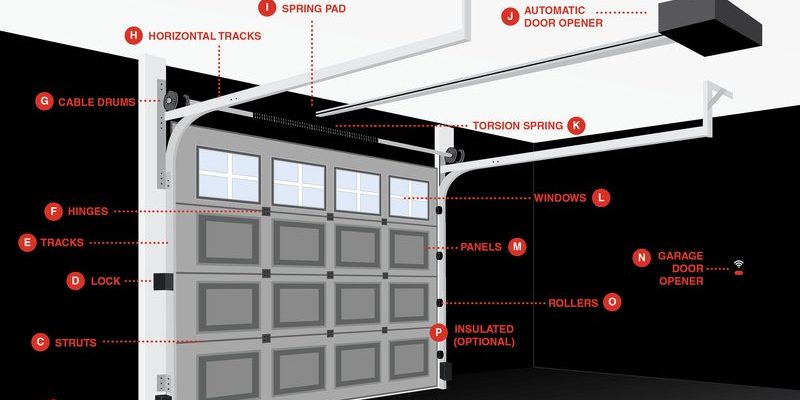
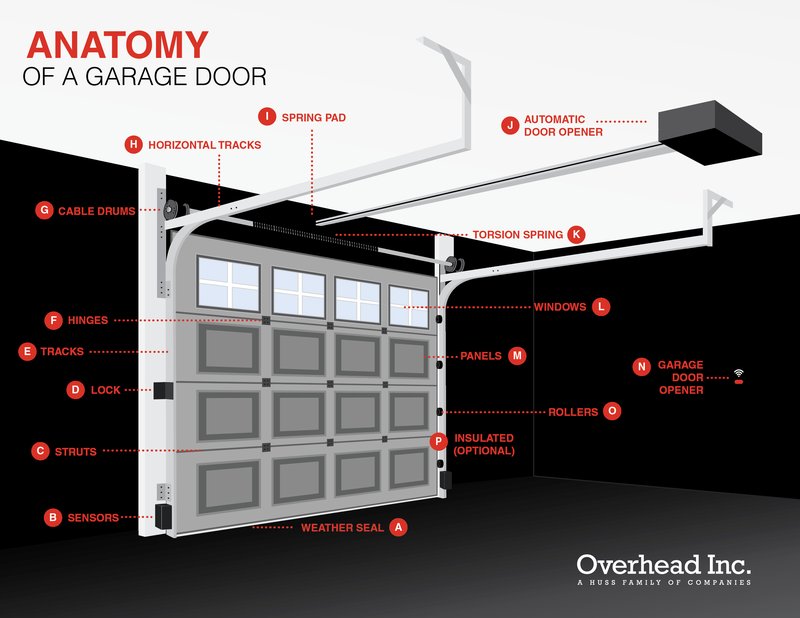
Before we jump into connecting your control panel, it’s helpful to familiarize yourself with what you’re working with. The overhead door control panel is essentially the command center for your garage door. It allows you to open or close the door manually and often features buttons for additional functions, like turning on the garage light or programming your remote.
Each brand might have slightly different designs or features, but most include a few common elements. You’ll typically find a wall-mounted panel, a button to control the door, and sometimes, security features like a keypad for code entry. It’s important to locate the code or pairing button, usually found inside the panel behind a cover, which will be essential in connecting your remote.
Let me explain: think of your control panel and remote as dance partners. They need to be in sync to perform well together. Without proper connection, your door may stubbornly refuse to budge, leaving you standing outside in the rain. Let’s not let that happen!
Gathering the Right Tools
Connecting your overhead door control panel doesn’t require a full toolbox, but having the right tools at your disposal helps. You will typically need:
- A compatible remote control for your system
- A step stool (if your panel is mounted high)
- Two hands (one for the control panel and another for the remote)
Most modern systems come with their remote, and it’s crucial to ensure they match. Each brand can have different frequencies, just like radio stations. If you grab a universal remote, make sure it’s compatible with your specific garage door opener model.
Now, let’s say you’ve got an old remote lying around from a previous opener. Here’s the thing—you can’t always guarantee it’ll work with your new setup. It’s often best to stick with the remote recommended by the manufacturer. It saves you headache in the long run.
Steps to Connect Your Control Panel
Ready to get hands-on? Here’s a step-by-step guide to connect your overhead door control panel with your remote. This process should work for most systems, but always consult your manual for model-specific instructions.
1. Power Up Your Panel: Make sure the control panel is plugged in and has power. Check for lights to ensure it’s operational.
2. Access the Control Panel: If you need to reach the panel above head height, climb your step stool carefully.
3. Find the Learn Button: Look for a button labeled “Learn” or “Program.” Press this button—it usually lights up or blinks to show it’s active.
4. Activate Your Remote: Within 30 seconds of pressing the Learn button, click any button on your remote. You should see the light on your control panel blink to confirm it’s received the signal.
5. Test the Remote: Step back and push the button on your remote. If all goes well, your door should start moving!
If your door doesn’t respond, don’t panic! It’s common for the remote to need a quick battery change or for you to redo the pairing process.
Troubleshooting Connectivity Issues
Sometimes, despite following all the steps, things just don’t mesh like you hoped. Let’s talk troubleshooting. If your remote isn’t connecting to the overhead door control panel, there are several potential issues to consider:
– Dead Batteries: The most common culprit. Open the remote and replace the batteries with fresh ones. It’s like giving it a quick energy boost!
– Distance and Interference: Make sure you’re close enough to the control panel when attempting to connect. Large metal objects or electronics can sometimes interfere with frequency signals, similar to how a bad Wi-Fi connection can drop out unexpectedly.
– Incorrect Connections: Double-check that you pressed the Learn button correctly and activated your remote within the appropriate timeframe. It’s easy to miss that window!
If you’ve tried these troubleshooting steps and still face issues, it might be time to consult the user manual or reach out to customer support for additional guidance.
Battery Maintenance for Your Remote
One thing that’s often overlooked is maintaining the batteries in your remote. Keeping fresh batteries on hand could save you a lot of headaches. Here’s how to keep your remote powered up:
1. Check Regularly: Take a minute once every few months to check your remote. If you notice the range decreasing or buttons becoming unresponsive, it’s likely time to replace the batteries.
2. Use Quality Batteries: Opt for well-known brands to ensure longer life. Cheap batteries might save money initially but can disappoint in performance.
3. Store Your Remote Properly: If you have a habit of tossing your remote into the bottom of your bag, consider a designated spot at home—this can save wear and tear on the device.
Regularly maintaining your remote ensures you don’t find yourself struggling with a stubborn garage door when you need it the most.
Considering Alternatives: Universal Remotes
Though using the remote that comes with your overhead door control panel is usually best, you might be considering a universal remote as an option. Here’s what you need to know about going down this road:
– Compatibility: Before purchasing, check the label to ensure it’s compatible with your specific garage door opener brand. Some universal remotes allow you to control multiple devices—pretty convenient!
– Programming Process: Connecting a universal remote may differ from the steps I listed earlier. Usually, it involves entering a specific code. Make sure to follow the instructions closely.
– Pros and Cons: While universal remotes offer flexibility, they can sometimes lack the features of original remotes. Think about your specific needs before deciding.
Ultimately, whether to go with a universal remote or stick with the original often depends on your preferences.
Final Thoughts on Connecting Your Control Panel
Getting your overhead door control panel connected with a remote can be straightforward if you take it step by step. Remember, like any tech issue, patience is key. If things get wonky, a little troubleshooting often does the trick.
With your control panel successfully connected, you’ll enjoy the convenience of opening your garage door with a simple click. That’s the beauty of modern technology—making everyday tasks simpler. So, put those tools away, give yourself a pat on the back, and enjoy the ease of your connected overhead door control panel!