
So, if you’ve recently bought an Overhead Door garage door opener and are staring at that tiny remote like it’s the most complicated gadget on Earth, don’t worry! We’ll break it down together. You’re going to find that syncing your remote with your opener is simpler than you might think. With just a little patience, you’ll be operating your garage door like a pro.
Now, before we begin, let’s set the stage. Overhead Door is a trusted brand known for its quality garage door openers, and they come with remotes that allow you to open your door with just a push of a button. Let’s explore how to connect, or “pair,” your remote so you can enjoy the convenience that comes with it.
Understanding the Basics of Your Garage Door Opener
Before we get into the nitty-gritty, it’s crucial to understand the components involved. Your overhead door garage door opener typically consists of:
- The main unit that mounts to your garage roof.
- A power cord connected to your home’s electricity.
- A remote control that allows you to open and close the garage door from a distance.
- Safety sensors placed near the ground that stop the door from closing if something is in the way.
Here’s the thing—every unit might look slightly different, but they almost all function in a similar way. This means that once you master connecting one, you’ll likely have the skills needed for others too. Think of this as a foundational step in becoming a garage door technician—at least in your own home!
Understanding how these parts work together is essential. The remote sends a signal to the opener, which triggers the door to open or close. If you can visualize that connection, it’ll be easier to set everything up.
Gathering Your Tools
You don’t need a toolbox full of fancy equipment to connect your garage door opener. Here’s a quick list of what you’ll need:
- Your Overhead Door garage door opener.
- The remote control that came with it.
- Step ladder (if your opener is mounted high).
- Battery for your remote (if it’s not already included).
Honestly, having a clear work area is helpful too. You want to avoid distractions and ensure your remote has a fresh battery ready to go. Nothing’s worse than thinking you’re having trouble pairing, only to discover your remote’s battery is dead!
Once you have everything ready, let’s move on to the actual connection process.
Connecting Your Remote Control
Now, this is where the magic happens! The specific steps can vary slightly, but there are general guidelines you can follow. Here’s how to connect your Overhead Door garage door opener to the remote:
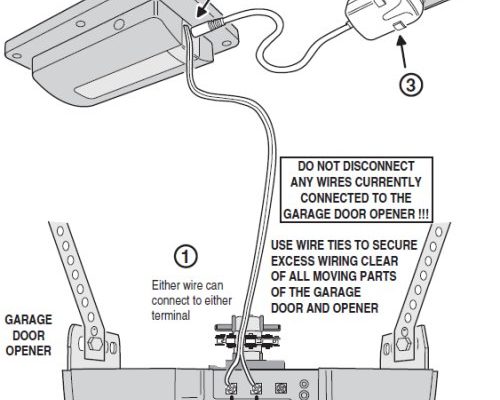
1. Locate the Learning Button: Most garage door openers have a ‘learning’ button. This is normally a small, colored button found on the back or side of the main unit.
2. Prepare the Remote: Ensure the remote control has a working battery. If you’re not sure, it’s easy to swap it out with a new one.
3. Press the Learning Button: Climb the step ladder (if necessary) and press and hold the learning button until the indicator light turns on. You may need to hold it for a few seconds; listen for a click.
4. Push the Remote Button: While the indicator light is still on, press and hold the button on your remote that you want to use for opening the door. Release both buttons after a few seconds.
5. Test the Connection: Wait for the opener to either flash its lights or move slightly, indicating the remote is connected. Then, try to open and close your garage door with the remote.
You might be wondering why it’s called a “learning” button. Kind of sounds like your garage door opener is going back to school, doesn’t it? In a way, it is; it’s learning to respond to new signals!
Troubleshooting Common Connection Issues
Sometimes, the connection process doesn’t go as planned. Don’t panic—we’ve all been there! Here are some common issues and their solutions:
– The Remote Doesn’t Work: First, double-check that your remote has a new battery. If it still doesn’t respond, try redoing the above steps.
– No Light Flash from Opener: This might mean that the learning button was not held long enough. Retry the connection process, ensuring to hold the button until the light activates.
– Interference from Other Devices: Sometimes, other electronics or radio signals can interfere. Try temporarily shutting off other devices like garage door openers from neighbors or radio-powered tools.
Let me explain a little further: if other remotes or nearby devices are using similar frequencies, it can disrupt your new pairing. All the more reason to ensure you have a clear, quiet work environment!
Resetting Your Garage Door Opener
If you find your remote still won’t connect, it may need a reset. This will wipe any previously stored codes. Here’s how to do it:
1. Find the Reset Procedures: Refer to your opener’s manual for specifics, but typically, you can hold down the learning button until the light goes off.
2. Reconnect New Devices: Once reset, follow the above steps to reconnect your remote.
3. Check the Manual: Overhead Door products often have slightly different processes, so checking the manual might save you some time.
Resetting is like giving your opener a fresh start. It clears out the cobwebs, letting you connect new remotes easily. If the original remote was lost, this step would also prevent unauthorized access.
Why Regular Maintenance Matters
Once you’re connected and rolling, don’t forget that regular maintenance is key. Periodically check the following:
– Battery Life of Remote: Keep an eye on the battery status. Replace it as soon as you notice any sluggishness.
– Opener Mechanics: Check that the opener is working smoothly, and give it a quick clean every so often.
– Safety Sensors: Regularly inspect the sensors to ensure they’re free from debris and functioning well.
Here’s the thing: taking a little time each month can save you from larger headaches down the road. Just like car maintenance, keeping your garage door opener in good shape will ensure it runs smoothly and lasts longer.
Exploring Alternatives: Universal Remotes
If you’re struggling with the original remote or simply want a backup, consider using a universal garage door remote. These devices can open multiple doors and can be a handy option if you have multiple garages or vehicles.
To use a universal remote, you’ll generally follow these steps, similar to connecting a new remote. However, ensure it’s compatible with Overhead Door products. You might find that some universal remotes have extra features, like built-in safety lights or even smartphone connectivity!
Overall, universal remotes can simplify your life, allowing you to manage all your garage doors from one remote.
When you know how to connect your Overhead Door garage door opener, it opens up a whole new realm of convenience. No more getting out of your car in the rain or wrestling with a heavy door! With a seamless connection, you can easily open or close your garage door with just a click.
Remember, don’t hesitate to troubleshoot if things don’t go as planned. You’ve now gathered the knowledge to connect, reset, and maintain your garage door opener. So sit back, relax, and enjoy the ease that comes with being in control of your garage door—all thanks to your handy remote!