Connecting this backup might seem daunting at first, especially if you’re not tech-savvy. But, in reality, it’s similar to piecing together your favorite puzzle—it just takes a little patience and the right instructions. This guide aims to walk you through each step of the process, helping you set up your Skylink battery backup with ease.
Why Use a Battery Backup?
Let’s face it: power outages can happen anytime, and they can be quite inconvenient. If you rely on your garage door opener to get in and out smoothly, a battery backup is a smart investment.
First off, it ensures that you can operate your garage door even when the power goes out. Imagine needing to leave for work or an emergency, only to find that your garage door won’t budge because of a blackout. A battery backup can prevent these frustrating situations.
Additionally, a battery backup can serve as a safeguard against surges and interruptions in power. It’s like having an insurance policy for your garage door opener—it gives you peace of mind knowing your system will stay functional.
Gathering Your Tools and Materials
Before diving straight into connecting your Skylink battery backup, it’s essential to gather everything you’ll need. Having your tools in place first makes the process smoother and prevents mid-project runs to find the right gear.
Here’s a quick checklist:
- Skylink battery backup unit
- Compatible Skylink garage door opener
- Power drill (if necessary)
- Screwdriver
- Wire cutters/strippers
- Safety goggles
Once you have everything set, it’s time to get down to the nitty-gritty of connecting your Skylink battery backup. Just remember to put on those safety goggles—better safe than sorry!
Identifying Your Garage Door Opener Model
Understanding which Skylink garage door opener model you have is crucial. Each model has specific requirements and methods for battery backup connections. You wouldn’t try fitting a square peg in a round hole, right?
To identify your model, check the user manual or the label on your opener. This information will guide you in finding the right connection points and ensuring compatibility with your battery backup.
Here’s a quick tip: if you can’t find the manual, many manufacturers provide PDFs on their websites. This way, you won’t be winging it without the necessary details.
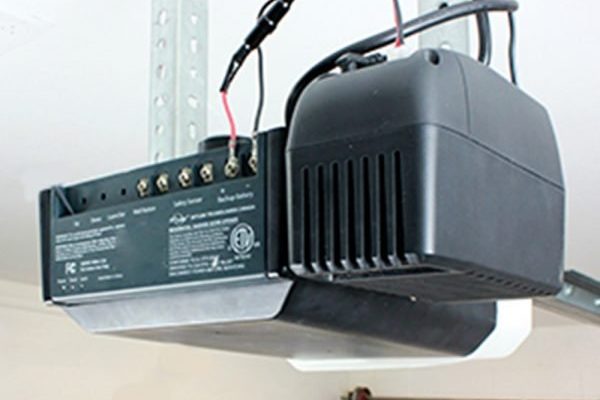
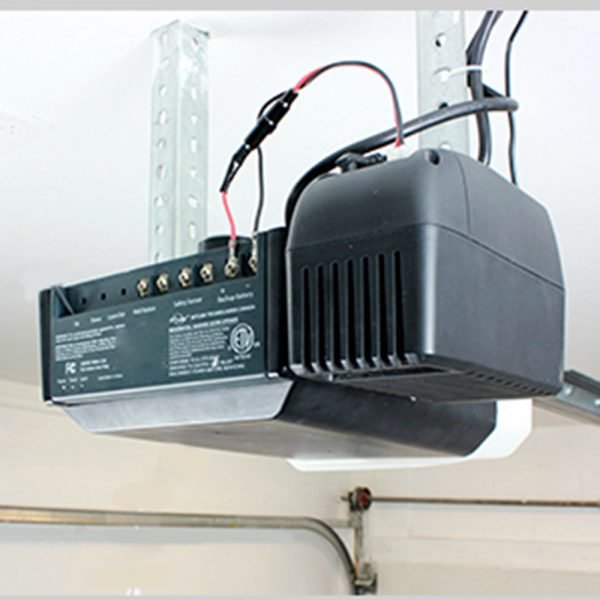
Connecting the Battery Backup
Now, onto the good stuff. Connecting your Skylink battery backup is where all that preparation pays off. Here’s how to do it step by step:
1. Unplug the Garage Door Opener: Safety first! Make sure to disconnect your opener from its power source before getting started.
2. Locate the Battery Connector: This is usually found on the back or side of the opener. It might be labeled and is often a simple two-pin connector.
3. Connect Wires: Take the wires from the battery backup and connect them to the battery connector. Ensure the colors match (red to red, black to black) to maintain positive and negative connections.
4. Secure the Connections: If necessary, use wire connectors or tape to secure the connections. You want to ensure everything is tight to avoid any loose ends.
5. Test the Connection: Now plug your garage door opener back in and press the button to see if everything works smoothly. You should see a light indicating that the battery backup is functioning.
If everything works, congrats! You’ve successfully connected your Skylink battery backup.
Troubleshooting Common Issues
Even the best plans can hit a snag. If you face issues during the connection process, don’t worry—troubleshooting is part of the journey! Here are some common hiccups and how to resolve them:
– The Opener Doesn’t Respond: Check the connections again. Sometimes, slight misalignments can cause failures.
– Backup Not Charging: Make sure the battery is properly connected and not faulty. Sometimes it just needs a little adjustment.
– Incompatible Model: Double-check that your garage door opener is compatible with the Skylink battery backup. You wouldn’t drive a bicycle with car keys!
If none of these solutions work, refer back to your model’s manual or reach out to Skylink’s customer service for more help.
Maintaining Your Battery Backup
Once you’ve connected your Skylink battery backup, there’s a bit of upkeep required to ensure it stays in tip-top shape. Think of maintenance as regular check-ups for your car—it keeps everything running smoothly.
– Charge the Battery Regularly: Make sure to keep the battery charged so it’s ready when needed.
– Inspect Connections: Periodically check the wiring and connections to ensure combat against wear and tear.
– Replace as Needed: If you observe any degradation in performance, consider replacing the battery. Most batteries have a finite lifespan!
A little regular care can go a long way in keeping your garage door opener functional, ensuring you are never left in a bind.
Final Thoughts
Connecting your Skylink battery backup doesn’t have to be a daunting task. With a bit of patience and the right steps, you can ensure that your garage door opener is safe and ready for any situation. Remember, it’s all about preparation and understanding your tools.
So, grab your tools, roll up your sleeves, and get started! Embracing your DIY side can be surprisingly rewarding, especially when you ensure that you and your belongings are protected from unexpected outages. Don’t hesitate to reach out if you hit a bump along the way—there’s always help around the corner. Happy connecting!