Many of us use a garage door opener multiple times a day, yet a lot of us don’t take the time to connect the remote correctly. Genie remotes are particularly popular because they’re user-friendly and reliable. If you’re ready to unlock a seamless experience with your Genie gadget, let’s dive into the steps that will help you connect your remote and make short work of any potential hiccups.
Gather Your Materials
Before you start, let’s ensure you have everything you need. Here’s a quick list:
- Your Genie remote control
- Your Genie garage door opener
- Access to a ladder, if necessary
- Two AAA batteries (if your remote doesn’t have them installed)
Having these materials ready will make the process smoother. You wouldn’t want to start assembling a puzzle only to realize you’re missing a piece, right? And don’t forget: the batteries in your remote control play a crucial role. Make sure they’re fresh and properly installed; if not, you might be troubleshooting the wrong issue altogether.
Identifying Your Genie Remote Model
Not all Genie remotes are created equal. Depending on your garage door opener’s age and model, you might have a different type of remote, which can affect the connection process. The most common models include the Genie Intellicode, Genie TriloG, and the older GMI series.
To identify your specific model, check the small label on the back or inside the battery compartment of your remote. If you’re unsure, you can consult the manual that came with your garage door opener. Having this information will be vital, especially if you need the specific codes or troubleshooting steps related to your model. Plus, it can save you from unnecessary frustration if you start following instructions that don’t apply to your remote.
Preparing to Program Your Remote
Now that you’ve gathered your materials and know which remote model you have, it’s time to prepare. First, make sure the garage door opener is plugged in and there isn’t any obstruction in its path. It sounds simple, but power issues or blockages can prevent proper syncing.
Next, clear your workspace around the Genie opener. If you need to use a ladder, ensure it’s safe and stable—no one wants to turn a simple remote connection into a trip to the ER! You’ll want clear access to the learning button on your garage door opener, which is usually located on the back. It might take a little searching, but it’s worth it to avoid any detours!
Connecting the Remote to the Garage Door Opener
Okay, here comes the fun part—programming your remote. While the process varies slightly between models, the overall idea is similar. Here’s a general guide that works for most Genie remotes:
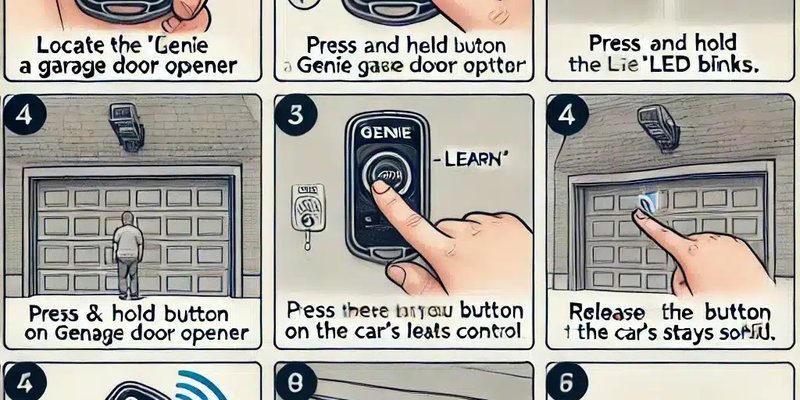
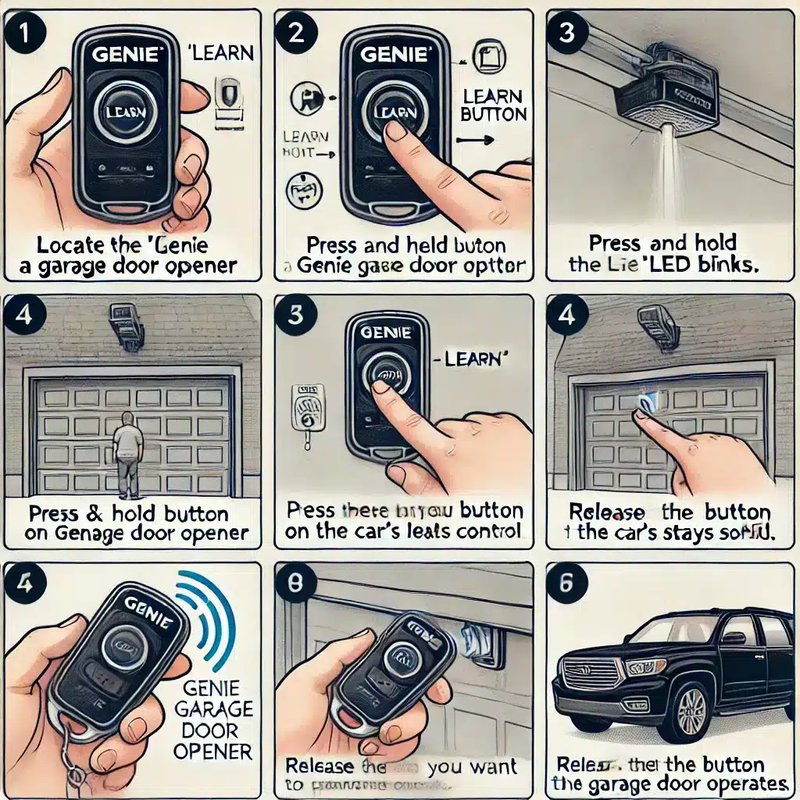
1. Press the Learning Button: Locate the learn button on your garage door opener. This is usually near the antenna and could be a colored button (often orange or purple). Press and release this button. You should see the indicator light start to blink.
2. Prepare the Remote: Within 30 seconds of pressing the learn button, press and hold the button on your remote that you want to use to activate your garage door. Keep holding it until you see the light on the opener blink or you hear a clicking sound.
3. Test It Out: Once you’ve released the remote button, try pressing it again. If your garage door opens, congratulations! You’ve successfully connected your Genie remote.
Let me explain why this method works: when you press the learn button, your garage opener is in a state of “listening” for a new remote to connect. This is like having a conversation where one person is waiting for the other to respond.
Troubleshooting Common Connection Issues
Even the most seasoned DIYers run into hiccups from time to time. If your Genie remote isn’t connecting, don’t panic. Here are some common issues and solutions:
– Unresponsive Remote: If your remote isn’t responding at all, check to ensure the batteries are new and inserted correctly. Sometimes they can be switched around accidentally.
– Remote Doesn’t Open Door: If the connection seems successful but the door doesn’t move, it might be a sign of a different issue. Ensure there’s no obstacle interfering with the door’s movement, and check any safety sensors that might be blocking operation.
– Reconnection Needed: If your remote used to work and suddenly stopped, it might need to be reprogrammed. This can happen due to changes in frequency or power outages. Follow the programming steps outlined earlier.
Meanwhile, checking and adjusting your garage door opener settings often clears up these issues. Also, consider looking into whether the wiring is intact or if anything appears damaged—sometimes things aren’t as they seem!
Alternative Options: Universal Remotes
If you find that your Genie remote just isn’t working for you—whether it’s old, lost, or broken—you might consider a universal garage door remote. Universal remotes are designed to work with multiple brands, making them a helpful alternative if you ever switch garage door openers.
The setup process for a universal remote is generally similar to that of a Genie remote. Just remember, not all universal remotes support every brand, so check compatibility before purchasing. This could save you time and frustration in the long run.
Final Tips for Success
As you finish up with your Genie remote connection, here are a few last-minute tips:
– Keep a Record: Write down the programming code (if applicable) or any other important information that may help in the future. It’s easier than sifting through manuals later on.
– Regular Maintenance: Consider doing a little maintenance on your garage door system. Lubrication, checking for obstructions, and inspecting safety features can help prolong the life of both your remote and opener.
– Stay Calm: If things don’t work immediately, take a step back. Sometimes a fresh approach can do wonders. Try again and know that persistence pays off.
Connecting your Genie remote shouldn’t feel like rocket science. With a little patience and these clear steps, you can make it happen. So, whether you’re pulling into your driveway or heading out for errands, enjoy the convenience your Genie remote brings to your daily life. Remember, every little task you take on just builds your confidence for the next one!
Originally posted 2025-02-02 01:07:32.