Connecting these sensors is easier than you might think, even if you’re new to this kind of home maintenance. Armed with just a few tools and a dash of patience, you’ll be able to connect your Liftmaster safety sensor like a pro. Let’s walk through this process step-by-step, ensuring you feel confident and capable as you tackle this task.
Understanding Liftmaster Safety Sensors
First things first, what are these safety sensors? Liftmaster safety sensors are small devices installed at the bottom of your garage door tracks. They work by sending an invisible beam of light between them. If the beam gets interrupted—like by a car or a child—the door stops closing to prevent accidents. It’s a simple yet effective safety measure that can save lives and prevent damage.
You might be wondering, “Why do I need to worry about connecting them?” Well, when your safety sensors aren’t connected properly, your garage door may not operate as it should. This could leave you stuck outside or, worse, risk injury. So, taking the time to ensure these sensors are connected correctly is well worth it.
Additionally, if you’re dealing with a Liftmaster remote, it’s essential to know that the remote won’t work correctly if the safety sensors are misaligned or malfunctioning. Understanding this relationship is key to solving any operational issues with your garage door.
Gathering Your Tools and Equipment
Before you jump into connecting your sensors, let’s make sure you have everything you need on hand. Trust me, having the right tools can make the job go smoothly without unnecessary interruptions.
- Screwdriver: A Phillips head screwdriver is typically required.
- Wire Strippers: These are useful if you need to trim or connect the wiring.
- Level: To ensure your sensors are aligned correctly.
- Measuring Tape: For precise placement of the sensors.
- Power Source: Ensure your garage door opener is plugged in and functioning.
Once you gather these tools, take a moment to check your garage door opener. Make sure it’s the correct model for the safety sensors you have. This information can usually be found in your user manual. If you don’t have the manual, a quick online search with the model number can provide helpful insights.
Locating and Mounting the Safety Sensors
Now that you’re armed with your tools, it’s time to focus on where to place those sensors. You’ll want to locate the lower brackets on each side of the garage door track. This is where the sensors will be mounted. Typically, they go about 4 to 6 inches above the ground, ensuring they are out of the way but still effective.
To mount the sensors, follow these steps:
1. Offer Placement: Hold each sensor at the desired height to see how they line up.
2. Mark the drill holes with a pencil.
3. Drill Holes where you’ve marked to secure the sensors.
4. Secure the Sensors: Use screws to attach them in place.
It’s important to ensure that both sensors are positioned facing each other. If they’re even slightly out of alignment, you could encounter issues with the garage door’s operational safety.
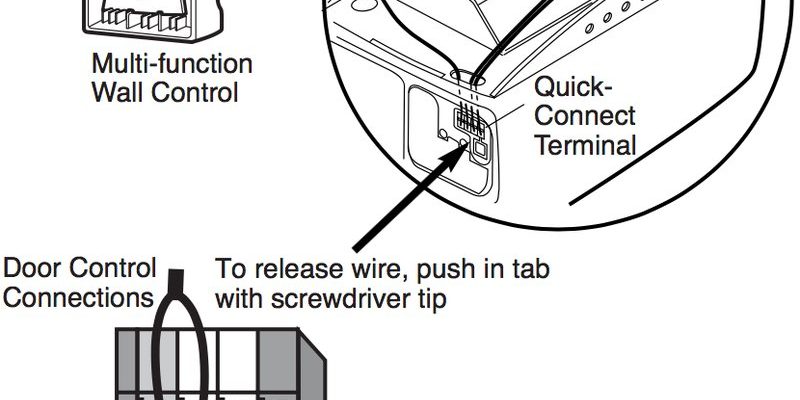
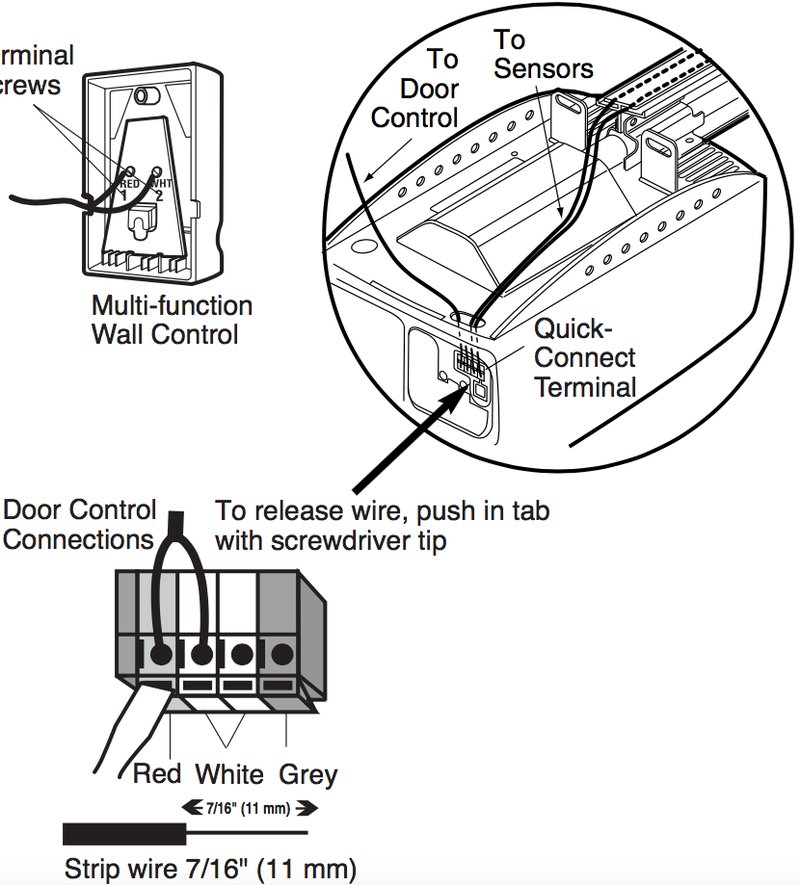
Connecting the Wires
Next up, let’s talk wiring. The sensors come with wires that need to be connected to your garage door opener. It might sound a bit intimidating, but just like connecting a few dots in a coloring book, it can be straightforward.
1. Locate the Wiring Terminals: Open your garage door opener’s cover to find the wiring terminals. They are usually labeled clearly.
2. Attach the Wires: Strip about half an inch of insulation from both ends of the sensor wires. Connect one wire to the ‘white’ terminal on the garage door opener and the other to the ‘yellow’ terminal.
3. Secure the Connections: Make sure the wires are tightly secured to prevent any disruptions in power.
Take a moment to double-check your connections before moving on. This step is crucial because incorrect wiring can lead to operational failures.
Testing Your Connection
Once everything is connected, it’s time to test the setup. This is the moment of truth to see if your efforts have paid off. Here’s how you can ensure everything is functioning correctly:
1. Power On the Garage Door Opener: Make sure it is plugged in and connected to power.
2. Use the Remote: Press the button on your Liftmaster remote. Listen for the sounds of the door attempting to operate.
3. Check the Safety Sensors: While the door is in motion, slide a piece of cardboard or an object into the path of the sensors. If everything is functioning correctly, the door should immediately stop and reverse.
If the door doesn’t react as expected, double-check the sensor alignment and the wiring connections. Remember, it can take a little patience to get everything just right.
Troubleshooting Common Issues
You might encounter a few hurdles when connecting your Liftmaster safety sensors, and that’s perfectly normal. Here are some common issues and how to troubleshoot them:
– The Door Doesn’t Close: If your door won’t close, it might be due to misaligned sensors. Make sure they’re facing each other and properly mounted.
– Flashing Lights: If you see flashing lights on your garage door opener, this typically indicates an issue with the safety sensors. Recheck the connections and alignment.
– Prolonged Reverse Operation: If the door keeps reversing without hitting anything, check the sensor to ensure there’s nothing obstructing the beam.
Don’t hesitate to consult the user manual for specific troubleshooting steps related to your model if problems persist.
Why Properly Connecting Sensors Matters
Understanding why proper installation of your safety sensors is essential can save you headaches down the road. These devices are not just technical components; they enhance safety by preventing potentially harmful situations. Think about it: these sensors are your first line of defense against accidental injuries or damage caused by a closing garage door.
If your sensors aren’t working, not only is your garage door less secure, but it may also violate local safety standards. Properly connecting and maintaining your sensors can ensure that your garage door operates reliably and safely, allowing you to focus on other important aspects of your life.
Connecting your Liftmaster safety sensor isn’t just a maintenance task; it’s essential for ensuring your safety and the smooth operation of your garage door. With the right tools, a bit of patience, and a touch of care, you can successfully tackle this project all on your own.
Remember, the key elements are proper sensor placement, secure wiring, and thorough testing. Stay vigilant about any signs of malfunction and maintain your equipment for continued peace of mind. Handling DIY projects like this can be empowering, so don’t shy away from taking charge of your home maintenance needs!