Your Chamberlain opener may be equipped with various remotes—like those sleek little devices that fit snugly in your palm. If your remote isn’t syncing properly or if the board isn’t responding as it should, understanding how to fix the circuit board can save you a some money and give you some satisfaction. Let’s go through this process together, as if we’re tackling the problem over a cup of coffee.
Understanding the Chamberlain Circuit Board
Before we jump into fixing things, it’s essential to get familiar with how the circuit board actually works. The circuit board is a compact piece of electronics inside your garage door opener. It manages signals from the remote, processes commands, and communicates with the motor that lifts your garage door. If you think about it as a little city, each part of the board has its own job, making sure everything runs smoothly.
Sometimes, you might notice that the remote doesn’t respond. This could be due to a fault in the circuit board. Contact points could rust, wires might get damaged, or even the board itself can malfunction. Knowing where these common issues typically occur helps you to be a more efficient problem solver.
Common Signs of Circuit Board Issues
It’s helpful to recognize what signs might indicate a problem with your Chamberlain circuit board. Here are a few things to watch for:
- No response from the door: If pressing the remote leads to silence, your circuit board might be the culprit.
- Intermittent operation: The door might work sometimes and not others. This could signal a faulty connection in the circuit.
- Blinking lights: Rapid blinking may indicate errors or a need for a reset.
You might be wondering what causes these issues. Weather changes, power surges, or simply wear and tear over time could lead to problems. Recognizing these early on can help you take action before things escalate.
Tools You’ll Need
Before diving into the repair process, ensure you have the right tools at your fingertips. Fixing the circuit board is generally straightforward but requires some basic household items:
- Screwdriver set: Choose a Phillips or flat-head screwdriver based on your opener’s design.
- Multimeter: This tool helps test connections and voltage levels.
- Wire cutters and strippers: If any wires are frayed, you’ll need these to replace damaged portions.
- Safety gloves: Protect your hands while working with electrical components.
Having these tools ready can prevent unnecessary trips to the hardware store and keep your repair process smooth.
Steps to Fix Chamberlain Circuit Board
Now that we’re equipped with knowledge and tools, let’s walk through the actual fixing process. Think of this as a DIY project—each step leads you closer to a smoother working garage door.
1. Disconnect Power
Safety comes first! Before doing anything, make sure you disconnect the power supply to the opener. This usually involves unplugging the opener from the outlet. If it’s hardwired, turn off the circuit breaker.
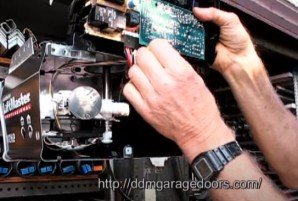
2. Open the Cover
Once you’ve ensured that everything is powered down, use your screwdriver to open the cover of your Chamberlain opener. Carefully remove any screws and gently lift off the cover to reveal the circuit board inside.
3. Inspect for Damage
Take a close look at the circuit board. Look for any burnt traces, disconnected wires, or obvious signs of wear. If it looks good on the outside, you may want to test connections using a multimeter.
4. Clean Contacts
Sometimes, dirt and corrosion can disrupt connections. Use a clean cloth to wipe down any dirty contacts. You can also use a small amount of contact cleaner. Just ensure everything is completely dry before moving on.
5. Replace Damaged Parts
If you identify any damaged components or wires, now is the time to replace them. Use your wire cutters to trim any frayed wires, and strip back the protective covering so you can reconnect them securely. Always be cautious about ensuring that the right connections are made, and refer to your opener’s manual if needed.
Testing Your Fix
Once you’ve completed the repairs, it’s time to put everything back together. Replace the cover, ensuring everything is secure, and reconnect the power source. This is when the nerves can kick in—will it work?
Press the remote button to see if the garage door responds. If it does, congrats! You’ve given your Chamberlain opener a second chance. If not, we might need to explore more in-depth troubleshooting.
When to Call a Professional
While many issues can be resolved with a little DIY effort, some problems signal that you should reach out to a professional. If your circuit board is physically damaged beyond repair, or if the issue persists despite your best efforts, consider getting expert help. A professional technician can provide an in-depth diagnosis and may have access to parts that are hard to find.
Remember, it’s always better to ask for help than to risk causing further damage.
Final Thoughts
Fixing the circuit board on your Chamberlain garage door opener may seem daunting at first. However, with a little patience, the right tools, and a solid plan, you can tackle this repair head-on. Not only does it save you money, but it also gives you insight into how your garage door functions.
Taking the time to understand what’s happening behind the scenes teaches you valuable skills and makes you feel empowered in your home maintenance journey. So next time your garage door gives you trouble, you’ll know exactly what to do. Happy fixing!