Today, we’ll walk through the whole process together—from identifying issues to replacing the panel. Whether you’ve got a remote that won’t sync or the control panel is unresponsive, this guide will help you get your garage door opener back in action. So, grab your toolkit and let’s jump in!
Understanding Your Sears Garage Door Opener Control Panel
Before you start the replacement process, it’s essential to understand what a control panel does. This little gadget is responsible for managing everything your garage door does. It communicates with the remote and acts as the command center, telling the motor when to open and close the door.
Typically, you’ll find a button panel or a digital display on the control panel. Some models include additional features like a keypad for entry, which adds convenience but can also add complexity. Familiarizing yourself with the layout and features before you dive into the replacement can ease the process.
If your Sears opener has been beeping or the LED lights have been flashing inconsistently, these signals often point to issues with the control panel. You might be wondering if it’s time to replace or just troubleshoot—a good question! If you’ve already tried basic troubleshooting steps, like resetting your opener or replacing the remote batteries, it could very well be that the control panel needs a swap.
Gathering Your Tools for the Task
Once you’re set on replacing the control panel, it’s time to gather the necessary tools. You’ll want to make sure you have everything at your fingertips to avoid running back and forth mid-job. Here’s a quick checklist of what you might need:
- A screwdriver (usually Phillips or flathead)
- Wire cutters or strippers
- Electrical tape
- Replacement control panel (make sure it’s compatible with your Sears model)
- Safety goggles (always a good idea when working with electrical components)
Having the right tools not only makes the job easier but also helps you stay safe. Be sure to check if your new control panel has any specific installation requirements which may need additional tools. If you’re itching to get started, let’s move on!
Disconnecting Power Safely
Safety first! Before you touch anything, make sure to disconnect the power to your garage door opener. You don’t want to accidentally trigger any movement while you’re working. Here’s how to do it:
1. Locate the circuit breaker: Find the breaker box in your home and switch off the specific breaker connected to the garage door opener.
2. Unplug the unit: For added safety, unplug the garage door opener from the wall outlet. This step ensures that there’s no power running to the unit while you’re working.
While it might seem like an easier option to skip these steps, they’re critical. It’s always better to err on the side of caution. Once the power is off, you’re ready to move on!
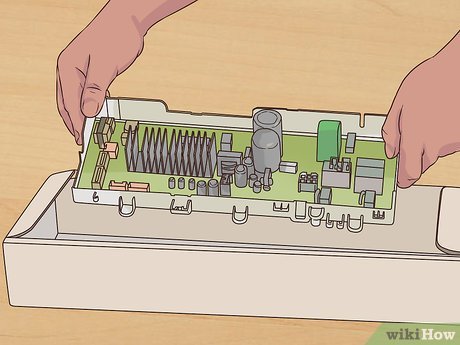
Removing the Old Control Panel
With the power cut off, you can get into the nitty-gritty of removing the existing control panel. Here’s a simple step-by-step:
1. Unscrew and remove: Use your screwdriver to remove any screws holding the control panel in place. Often, you’ll find these on the sides or the back.
2. Disconnect the wiring: Gently pull the panel away from the unit. You’ll see wires connecting the panel to the opener. Take a photo or make a note of how they’re connected; this little trick makes it easier to hook up the new panel later.
3. Detach the old panel: Once you’ve got a good view of the wires, disconnect them. Be careful and use your wire cutters or strippers if necessary.
If you find that the wires are frayed or damaged, you might want to consider replacing them as well. Now that the old panel is out, let’s get the new one ready!
Installing the New Control Panel
This is where the magic happens. Installing the new panel is much simpler than you might think. Here’s how to get it done:
1. Connect the wiring: Refer back to the photo or note you took earlier. Match the new control panel wires to the same terminals as the old one. Make sure they’re secure! You don’t want any loose connections.
2. Secure the panel: Hold the new control panel in place and screw it back into position. Ensure it’s snug but don’t overtighten; you don’t want to strip the screws.
3. Test before finalizing: Before putting everything back together, go ahead and plug the unit back in. Turn on the circuit breaker. Check if the control panel lights up or if any indicators show it’s working. This quick test can help catch issues before you finish the installation.
Honestly, this part feels like a small victory already!
Syncing the Remote with the New Control Panel
So, you’ve just installed the new control panel, but it won’t do much good if your remote isn’t syncing with it properly. If you’ve never done this before, don’t sweat it; it’s usually a simple process. Here’s how to synchronize your remote:
1. Locate the “Learn” button: This button is typically found on the back or side of the garage door opener motor.
2. Press and hold the button: When you press the Learn button, the opener lights will blink. You usually have about 30 seconds to sync your remote.
3. Press the remote button: While the opener lights are flashing, press the button on your remote that you want to use. You should see the lights blink again, indicating that it has successfully synced.
If you have multiple remotes, repeat this process for each one. If you run into trouble, make sure to check the remote battery: a weak battery can often lead to connection issues.
Finalizing and Testing Your Garage Door Opener
Now comes the moment of truth! It’s time to reassemble everything and see if your hard work paid off. Here’s what you need to do:
1. Re-screw the cover: If you had to remove any covers or shields to access the panel, make sure to put them back securely.
2. Restore power: Head back to your circuit breaker and flip the switch back on. Then plug the opener in, if you unplugged it.
3. Test the system: Use your remote or the wall button to test the door. It should open and close smoothly. Listen for any unusual sounds; if something feels off, don’t hesitate to double-check your connections.
This is where you can sit back and enjoy the fruits of your labor. If all goes well, give yourself a pat on the back—you’ve successfully replaced your Sears control panel!
Replacing the control panel on your Sears garage door opener isn’t just manageable; it can also be quite rewarding. You’ve equipped yourself with the knowledge and skills to handle this repair, saving both time and money. Whether your garage door is now opening effortlessly or you’re simply enjoying a job well done, you’ve tackled a task that many people might shy away from.
So next time something’s not right with your opener, you’ll know just what to do. Keep this guide handy for future reference if needed, and consider spreading the word to friends or family who might find themselves in the same boat. Happy DIY-ing!