
So, why focus on the safety sensor specifically? Well, if your garage door isn’t opening or closing correctly, or if it reverses back up unexpectedly, the sensors could be the culprit. This blog will guide you step-by-step through the process of replacing these sensors and syncing them with your remote, ensuring you’re back up and running in no time.
Understanding the Basics of Sears Safety Sensors
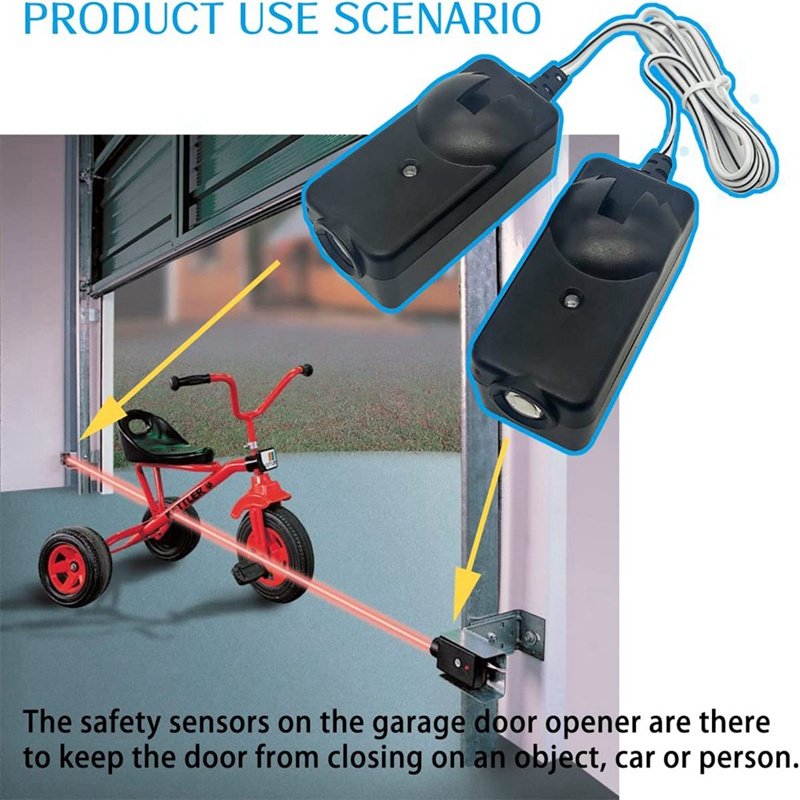
Before diving into the replacement process, it’s essential to understand what safety sensors do. These sensors are small devices mounted on each side of the garage door, typically around six inches above the ground. They use infrared light beams to detect objects in the door’s path. If anything interrupts this beam while the door is closing—like a car, pet, or even a child—the door will reverse and stop. You might think of these sensors as your garage door’s way of “seeing” what’s in front of it!
Common Signs of a Malfunctioning Safety Sensor
So how do you know when it’s time to replace your safety sensors? Here are a few signs to watch out for:
- Flashing Lights: If the LED lights on one or both sensors are flickering, that’s a red flag.
- Door Reversing: If the door reverses without hitting anything, your sensors might not be aligned properly or could be malfunctioning.
- Blocked Sensors: Dirt, spider webs, or any debris can block the sensor’s beam. A quick cleanup might fix the issue before you consider replacing them.
If you observe any of these indicators, it’s time to roll up your sleeves and replace those sensors.
Gathering Your Tools for Replacement
Before you start replacing the safety sensors, you’ll need to gather a few tools:
- Flathead and Phillips Screwdrivers: These will help you remove the old sensors and install the new ones.
- New Safety Sensors: Make sure you purchase the correct sensors for your Sears garage door model.
- Level (optional): This ensures that your new sensors are perfectly aligned after installation.
Having everything ready before you start makes this process smoother and quicker. So, take a moment to gather these items, and let’s move on to the actual replacement!
Removing the Old Safety Sensors
Now that you’ve got your tools ready, it’s showtime. Here’s how to remove the old sensors:
1. Unplug the Garage Door Opener: This is crucial for safety. You don’t want the door opening unexpectedly while you’re working.
2. Locate the Sensors: Find the sensors on either side of the door. They’re usually mounted about six inches from the ground.
3. Unscrew the Sensors: Use the appropriate screwdriver to remove the mounting screws that hold the sensors in place. Gently pull the sensors away from the wall or bracket.
4. Disconnect Wires: Carefully disconnect the wires connected to the old sensors. You might notice color-coded connectors. Make a note of where they go for reference later.
It’s a fairly simple process, but take your time. You don’t want to break anything inadvertently!
Installing the New Safety Sensors
After you’ve removed the old sensors, it’s time to install the new ones. Here’s how:
1. Connect the Wires: First, connect the wires of the new sensors to the corresponding wires from the garage door opener. Typically, there are two wires for each sensor (one for power and one for the signal). Match the colors to ensure you connect them correctly.
2. Secure the Sensors: Position the new sensors in the same location as the old ones. Use your level to make sure they’re straight, then secure them in place with screws.
3. Check Alignment: This step is critical. Ensure both sensors are aligned with each other. If they’re misaligned, the garage door won’t operate properly. Once they look good, you can tighten the screws fully.
4. Plug the Opener Back In: Now that your sensors are installed, plug the garage door opener back into the power source.
Syncing the New Sensors with Your Remote
You might be wondering if the new sensors will automatically sync with your garage door opener. Most often, they do. However, it helps to reset or sync your system to ensure everything functions smoothly. Here’s a quick rundown of how to do it:
1. Locate the Learn Button: On your garage door opener, find the “Learn” button. It’s typically on the back or side of the unit.
2. Press and Hold the Button: Press and hold the Learn button for about six seconds, or until the indicator light turns off. This resets the opener.
3. Activate the Remote Control: After resetting, press the button on your remote that you want to sync. The indicator light will blink, and then stay on. If the light goes off, it means syncing was successful!
4. Test the Door: Finally, test your garage door to confirm the sensors and remote are working correctly. Press the remote button to open or close the door.
If everything works, congratulations! You’ve successfully replaced Sears’ safety sensor.
Troubleshooting Common Issues
Even after replacing the sensors, you might run into some hiccups. Here are some troubleshooting tips to help you out:
– Sensor LED Not Lit: If the LED on one or both sensors isn’t lit, double-check the connections. Ensure the wires are securely attached and the sensor is powered.
– Door Reversing Again: If the door keeps reversing, make sure there’s no obstruction in the path of the sensors. Even a tiny item can trip the safety feature.
– Check the Sender and Receiver: The sending sensor must point directly at the receiving sensor. Adjust their angles slightly if necessary.
If you continue to face issues, refer back to the manufacturer’s recommendation or consider contacting a professional for further assistance.
Why Proper Maintenance Matters
Once you’ve replaced your safety sensors, it’s crucial to keep them in good shape. Regularly check for any blockages and clean the sensor lenses. Over time, dirt or dust can accumulate and interfere with their function.
Also, always be aware of the garage door’s behavior. If you notice any irregularities, it might be time to troubleshoot again. Keeping an eye on your garage door system will help prevent future problems and ensure everything works as it should.
Replace the sensors right, and you’re not just keeping your garage safe; you’re also extending the lifespan of your garage door opener system.
In conclusion, replacing the safety sensor on your Sears garage door opener isn’t just a project; it’s a way to secure your home and enhance your peace of mind. If you follow this guide step-by-step, you’ll not only have the satisfaction of doing it yourself but also the safety assurance that comes from properly functioning sensors. Whether you’re a DIY enthusiast or a first-timer, you can handle this task! Happy fixing!