Replacing a Skylink garage door opener does sound daunting at first. However, it’s essentially like changing a light bulb or putting together a piece of furniture from a big box store. Sure, it may require some tools and a bit of patience, but with a step-by-step approach, you’ll have it done in no time. Let’s dive into the nitty-gritty of the process.
Gathering the Right Tools and Equipment
Before jumping into the installation process, it’s essential to gather everything you’ll need. Consider this gathering phase as your preparation for a mini DIY adventure. Here’s a checklist of what you need:
- Replacement Skylink Garage Door Opener
- Power Drill or screwdriver
- Wrench set
- Measuring Tape
- Step Ladder (if necessary)
- Safety goggles
Having your tools ready will save you from scrambling around mid-project. Here’s the thing—take an inventory to ensure you won’t need to run out to the hardware store when you’re knee-deep in the installation process. Check that the replacement opener is compatible with your garage door system. Skylink offers various models, so ensure you have the correct one.
Removing the Old Garage Door Opener
The next step is to remove the existing opener. This might seem like a daunting task, but it’s quite straightforward. Start by disconnecting the power supply to the garage door opener to ensure safety. There’s nothing worse than a surprise electrical shock while you’re focused on your task!
Once the power is off, it’s time to get your hands dirty. Here’s how to do it:
1. Detach the door from the opener. You can usually do this by pulling the emergency release cord, which is often a red handle hanging down from the opener.
2. Unfasten the mounting hardware. Use your power drill or wrench to remove bolts and screws. Keep all parts in a container, so they don’t go missing!
3. Take out the old opener. Gently lower it from its mounting position. You might want a helper here, especially if it’s a bit bulky.
Once you’ve removed it, take a step back and give yourself a pat on the back. You’ve just conquered the first half of the battle.
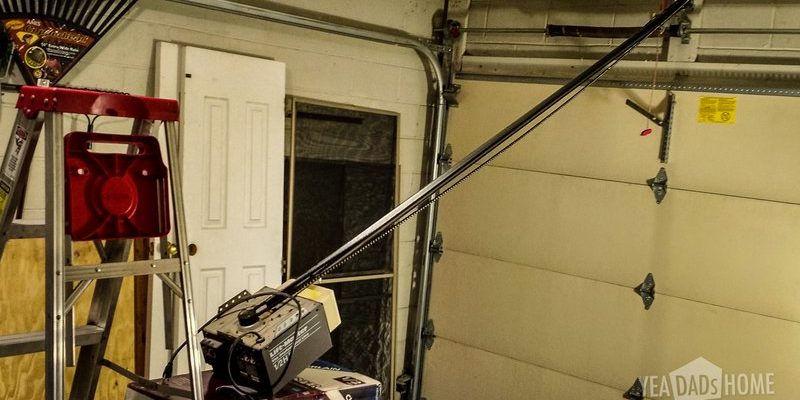
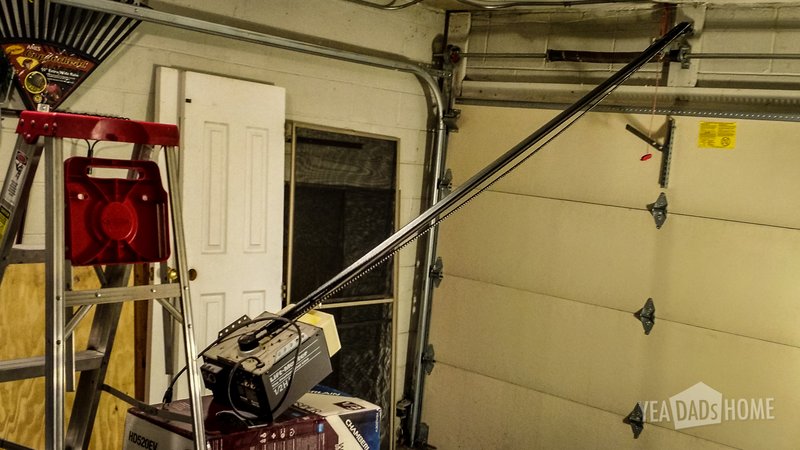
Installing the New Skylink Garage Door Opener
Now for the exciting part—installing the new opener! Think of it like setting up a new video game console; it can be a fun process if you follow the instructions.
1. Mount the new opener. Position it onto the ceiling or wall where the previous opener was installed. Make sure it’s level using your measuring tape. A crooked opener can lead to problems later.
2. Secure it in place. Use screws or bolts to fasten the opener firmly. It should feel stable without any wiggling.
3. Reconnect the door. Attach the door to the opener by pulling the release cord back towards the opener. This allows the mechanism to work together again.
Throughout this process, it’s crucial to follow the manual that comes with your new Skylink opener. Each model may have some unique features, and knowing these can help prevent any future headaches.
Wiring the New Opener
Wiring might just sound like a technical term, but it’s just another simple step. You don’t need to be an electrician to handle this part—just follow along!
Here’s how to connect the power:
1. Locate the power cord. Plug it into a nearby outlet and ensure it is not frayed or damaged.
2. Connect the wires to the opener’s motor unit. Usually, this involves matching color-coded wires—just like connecting LEGO blocks. Make sure you secure them with the wire nuts provided in your kit.
3. Check the safety features. This includes the infrared sensors at the base of the garage door. Position them just above ground level for proper functionality.
By wiring the new opener properly, you’re setting the stage for a smooth operation later. It’s like laying down a solid foundation before building a house.
Syncing the Remote Control
Once the opener is wired and securely mounted, it’s time to sync your remote control. This is a crucial step since the remote is the key to making everything work seamlessly—from opening your garage door with just the click of a button to ensuring your home stays secure.
1. Locate the “learn” button on your Skylink opener. It’s often found on the back of the unit.
2. Press and hold the “learn” button. You may need to hold it for a few seconds until an indicator light comes on.
3. Press the button on your remote. This tells the opener to recognize your remote control.
Remember, you might need to repeat this process if you have multiple remotes or keypads you want to sync. Once you’ve done that, give yourself another round of applause!
Testing Your New Garage Door Opener
Testing the functionality of your new Skylink garage door opener is essential. After all, you didn’t just install a beautiful piece of machinery for it to sit silently in your garage, did you? Here’s how to ensure everything works:
1. Power it on. Ensure your new opener is plugged in and powered.
2. Test your remote control. Press the button and watch the magic! The door should respond by opening or closing smoothly.
3. Activate the safety features. Test the safety sensors by placing an object in the door’s path. The door should stop or reverse once it senses the obstruction.
If all goes well, you can sit back, relax, and celebrate your success. Enjoy the satisfaction of knowing you tackled this job on your own!
Troubleshooting Common Issues
Even the best-laid plans can hit some snags. If your new Skylink opener doesn’t seem to work as expected, don’t panic. Here are some common issues and their fixes:
– Remote Doesn’t Work: First, check the batteries. A weak battery can cause your remote to malfunction. Also, ensure you synced the remote properly.
– Door Doesn’t Open or Close Completely: This can indicate a problem with the alignment of the door tracks. Make sure they’re clear of debris and properly aligned.
– Strange Noises: If you hear grinding or rattling, something could be out of alignment. Inspect your opener’s moving parts and make adjustments as needed.
At this point, remember that troubleshooting can be part of the process. Sometimes, it takes a little bit of tweaking to get everything just right.
You’ve successfully replaced your Skylink garage door opener! This process, while it may seem intricate, is entirely manageable with the right tools and mindset. You tackled challenges, learned new skills, and now you have a reliable opener that works smoothly.
Understanding how to handle the opener can save you time and money in the long run. Plus, there’s something gratifying about knowing you did it all yourself. So, next time you hear that garage door creak open, enjoy the little victory. Whether it’s for your car, storage, or a hidden treasure of holiday decorations, your garage door is now back in business! Keep the manual handy, and don’t hesitate to revisit any steps if needed. Happy DIYing!
Originally posted 2025-02-07 11:19:11.