
Chamberlain wall buttons are handy tools that make garage access a breeze. They connect directly to your garage door opener, letting you control the door without digging through your pockets for the remote. Like the good friend who always has your back, you want your wall button working perfectly. So, let’s dive into how to replace it seamlessly.
Understanding Your Chamberlain Wall Button
Before replacing your wall button, it’s key to understand what you have on your hands. Chamberlain’s wall buttons come in different models, but most work in similar ways. They typically feature a durable, weather-resistant outer casing, making them tough against the elements. These buttons communicate with your garage door opener, enabling you to operate it from inside your home or garage.
When you press the wall button, it sends a signal (often a radio code) to your garage door opener’s receiver. Think of it like pressing a doorbell; it’s how you alert your opener to ‘let you in.’ If your wall button stops working, it could mean a simple issue like a dead battery or something bigger, like needing a new button entirely.
Gather Your Tools for the Job
Before starting the replacement process, gather your tools. Having everything on hand will make the switch go much smoother. Here’s a quick list of what you’ll need:
- Phillips or flathead screwdriver – Depending on what screws your wall button has.
- New Chamberlain wall button – Make sure it’s the right model for your opener.
- Wire stripper or cutter – Useful if you need to disconnect any wires.
- Voltage tester – Optional, but a good idea to ensure everything’s safe before handling wires.
Having your tools together means less time wasted rummaging around your garage. And who knows? You might find other little projects waiting for you!
Removing the Old Wall Button
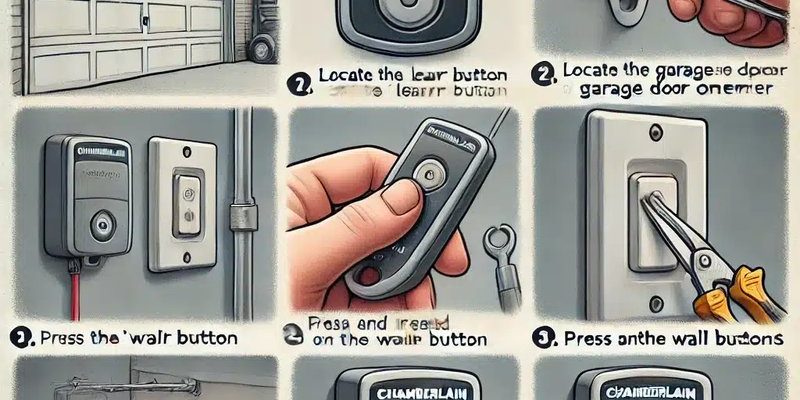
Now, let’s get to the fun part: removing the old wall button. It’s pretty straightforward, but let’s break it down step-by-step. First, ensure the power to your garage door opener is turned off. This way, you can work safely without worrying about surprises.
1. Locate the wall button – This is usually mounted near your garage entrance.
2. Unscrew the wall plate – Use your screwdriver to remove any screws holding the button in place. Place these screws somewhere safe so you don’t lose them!
3. Disconnect the wires – Carefully peel back the wall plate, exposing the wires connected to the button. If they’re attached with wire nuts, twist them off. If it’s a different connector, gently detach them.
4. Remove the old button – Once the wires are disconnected, remove the old wall button and set it aside.
That’s it! The toughest part is over, and you’re one step closer to a fully functional wall button.
Installing the New Chamberlain Wall Button
Now that the old button is out of the way, let’s install your shiny new Chamberlain wall button. The process is just as easy, and follow these steps carefully:
1. Position the new button – If your new button has a similar shape and size, place it in the same position as the old one.
2. Connect the wires – Attach the wires to the corresponding terminals on the new button. Typically, there are two connections: one for power and one for the triggering signal. If you have a voltage tester, now’s the time to check for power before connecting.
3. Secure the button – Once connected, carefully push the button back into place, ensuring no wires are pinched.
4. Screw the wall plate – Replace the screws that hold the plate. Give a gentle but firm tightening, but don’t overdo it—this isn’t a wrestling match!
Your new wall button is almost ready!
Testing Your New Wall Button
With everything securely in place, it’s time to test your new wall button. Go back to your garage door opener and turn the power back on. This step usually involves plugging it back in or flipping a circuit breaker.
Once powered up, press your new wall button. If everything is connected correctly, your garage door should respond by opening or closing smoothly. If it doesn’t work, don’t panic! Check your connections again to ensure everything is snug and in place, and double-check if there’s a reset option on your garage door opener.
Troubleshooting Common Issues
Sometimes, even the best installations can run into hiccups. If you’ve finished installing, and it’s not working as planned, here are a few common issues to check:
– No Power: Make sure the power to the garage door opener is on. A tripped circuit breaker could be the culprit.
– Wiring Issues: Double-check your wire connections. Improper connections can prevent the button from functioning correctly.
– Need to Sync: In some cases, your garage door opener may need to be synced with the wall button after installation. Consult your manual for a specific process for your model.
– Battery Check: If your wall button runs on batteries, ensure they are working and installed correctly.
With a bit of patience, you’ll usually solve these problems quickly without calling in an expert.
Enjoying Your Upgraded Experience
Congrats! You’ve successfully replaced your Chamberlain wall button. Now, stand back and admire your handiwork. Just like getting a new remote, having a reliable wall button enhances your garage experience. Picture it opening with just a simple press—no more fumbling for keys or running around to get the remote.
Having a functional wall button not only makes your garage more user-friendly but also adds an extra layer of convenience to your home. You’ll notice how much smoother the process becomes when you know everything is working just as it should.
As you continue to enjoy your upgraded setup, familiarize yourself with other features your new wall button may offer, like lighting or programming for multiple doors. After all, a new button can be more than just a replacement—it’s an upgrade to your daily routine.
In summary, whether you’re tackling this project for the first time or not, replacing your Chamberlain wall button is simple. With just a few tools and a little time, you can boost your garage’s functionality. So grab that new wall button, follow these steps, and get ready for a smoother ride each time you roll in or out!