If you’ve noticed slow response times, connectivity issues, or the hub simply won’t sync anymore, you might be thinking about getting a replacement. Don’t worry; it’s not as daunting as it sounds! In this guide, I’m going to take you through each step of replacing your LiftMaster smart hub as easily as brewing your morning coffee. Trust me; with a little guidance, you’ll be back to opening your garage door with just a tap in no time.
Why Would You Need to Replace Your Smart Hub?
First off, let’s explore why your smart hub might need replacing. Just like a car that runs out of gas, smart hubs can experience wear and tear. Over time, issues can arise due to updates, connectivity troubles, or simply because technology evolves. If you’ve ever found yourself staring at your smartphone, tapping in vain while your door remains stubbornly closed, it’s likely a sign your hub is ready for a refresh.
A common indicator that something’s off is if your smart hub doesn’t respond when you send a command from your app. You might see error messages that you’ve never encountered before. Sometimes, it’s just a matter of resetting or syncing again, but if you’ve already tried those troubleshooting steps and nothing works, it may be time to invest in a new hub.
Gathering the Necessary Tools
Before diving in, let’s make sure you have everything you need. Replacing the LiftMaster smart hub can be pretty straightforward, but it helps to have your toolkit at the ready. Here’s a quick list of what you’re going to need:
- New LiftMaster Smart Hub: First things first, without the hub itself, you’re not going anywhere!
- Smartphone: You’ll use this to control your garage door apps.
- Wi-Fi Connection: This thing needs to be connected to your home network.
- Screwdriver: Depending on your system, you may need one or more tools to access the hub.
- Access to your Garage Door Opener: Make sure you can reach the unit easily.
Now that you’re fully equipped, you can approach the replacement process with confidence. Letting your hub sit around without a proper connection is like having a smartphone without Wi-Fi—kind of pointless!
Removing the Old Smart Hub
When it’s time to remove the old hub, you want to be careful. Start by unplugging it from your garage door opener and your Wi-Fi. This step is akin to turning off the lights when you leave a room—it ensures nothing gets accidentally activated while you’re working.
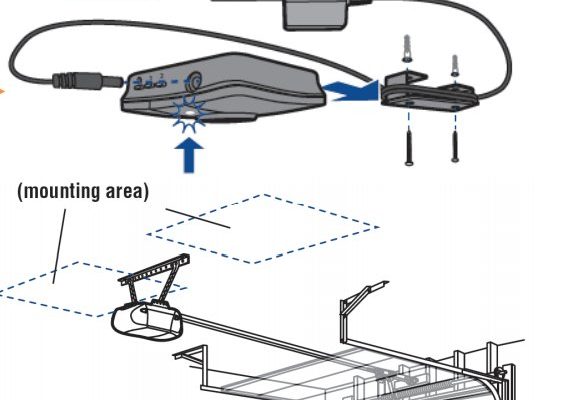
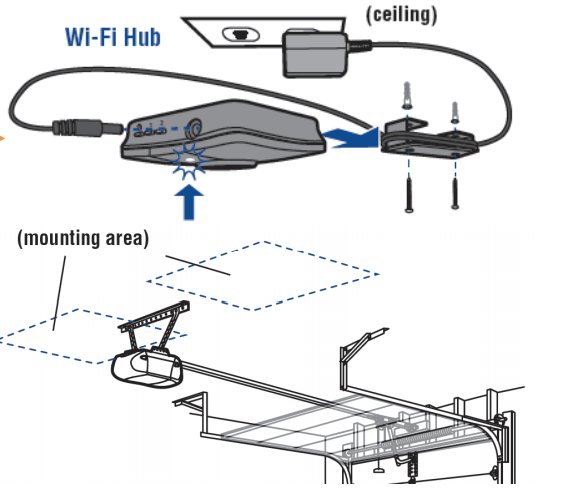
After it’s unplugged, take a look at how it’s mounted or attached. Most LiftMaster smart hubs will have screws holding them in place. Grab your screwdriver, and gently unscrew it. Keep in mind where the screws go; you don’t want to search for them later!
Installing the New Smart Hub
Now for the fun part—bringing in that shiny new replacement! Start by mounting it in the same place as the old hub. Use your screwdriver to secure it tightly but be careful not to overtighten, as you don’t want to damage the hub.
Once it’s mounted, plug it back into your garage door opener. You want to ensure it’s snugly connected and ready to roll. It’s like plugging in your phone after a long day; you want to feel that connection.
Syncing the New Hub with Your Wi-Fi
After installation, it’s time to sync your new hub with your Wi-Fi. Open the LiftMaster app on your smartphone and follow these steps:
1. Open the App: Start the app and navigate to settings or Smart Hub setup.
2. Choose ‘Add Device’: Look for an option to add a new smart hub.
3. Enter Your Wi-Fi Details: You’ll be prompted to enter your Wi-Fi network name and password.
4. Follow the Prompts: The app will guide you through syncing. This usually involves pressing a button on the hub while interacting with your phone.
This step is crucial for ensuring everything works together seamlessly. If you do it right, you’ll hear a little beep, signaling that your hub is ready to roll!
Testing the New Smart Hub
Once everything is set up, don’t rush to relax just yet! You’ll want to test your new smart hub to ensure everything’s working as intended. Go ahead and try sending a command from your smartphone—open the garage door and see if it’s responsive.
If that works, the next step is to test other features, like the app’s ability to schedule opening and closing times or monitor status. If you run into hiccups, don’t stress; troubleshooting is just part of the tech world. Here’s a quick checklist for common issues:
- Check your Wi-Fi connection.
- Ensure the hub is securely powered and connected.
- Re-check the app settings for any missed configurations.
Once everything works smoothly, it’s time to celebrate. Just think, you’ve taken control of your garage door again!
Maintenance Tips for Your Smart Hub
Now that you’ve successfully replaced your LiftMaster smart hub, keeping it in good shape is key. Regular checks can prevent future frustrations. Here’s what to keep an eye on:
– Wi-Fi Connection: Ensure that your Wi-Fi signal is strong where the hub is located. If needed, consider placing a Wi-Fi extender nearby.
– Software Updates: Just like your smartphone needs updates, your garage system does too. Regularly check the app for updates to ensure everything runs smoothly.
– Regular Resetting: If things start acting up, sometimes a simple reset is all it takes to restore functionality.
By staying on top of these simple maintenance tips, you can avoid many headaches down the line. It’s like tending to a garden—regular care keeps things blooming beautifully.
In closing, replacing your LiftMaster smart hub doesn’t have to be a hassle. Armed with the right tools and knowledge, you can take this project on with ease. Now, you’re more than equipped to maintain your garage door system, ensuring it operates smoothly and efficiently. Plus, you no longer have to worry about those annoying connectivity hiccups! Enjoy the convenience of a well-functioning garage door opener, and feel free to share your tech triumphs.