
You might be thinking, “But why do I need to replace it?” Well, a control panel can malfunction for various reasons, like wear and tear, electrical issues, or simply outdated technology. Whether your buttons aren’t responding, the lights won’t turn on, or you want to upgrade to a more modern model, I’ll guide you through replacing your LiftMaster control panel with ease. So grab a cup of coffee, and let’s dive in!
Understanding Your LiftMaster Setup
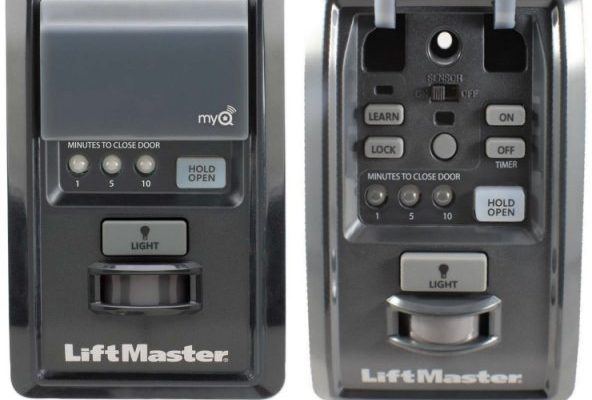
Before we get into the nitty-gritty of replacing your control panel, let’s understand what we’re working with. LiftMaster control panels come in different types, but they generally have a straightforward design. They include buttons for opening and closing your garage door, lights, and sometimes features for settings and programming.
Think of the control panel as the brain of your garage door system. It communicates with the remote and the opener unit, telling them when to act. If any of these connections are off, you might find yourself stuck outside, wishing your car was a little more cooperative—and that’s no fun!
It’s also worth checking if you’re dealing with a standard LiftMaster remote or perhaps a more advanced one that brings smart technology into play. This could affect not just your replacement options but also how the new panel syncs up with your system.
Gathering Your Tools
Now that you know what you’re dealing with, it’s time to gather the necessary tools. Think of this step as assembling your DIY toolbox for a mini home improvement project. Here’s a quick list of what you’ll need:
- Replacement Control Panel: Make sure it’s compatible with your LiftMaster system.
- Screwdriver: A Phillips head should do the trick.
- Wire Strippers: You might need these if you’re dealing with wires.
- ELECTRICAL TAPE: Essential for safety and insulation.
- Safety Goggles: Just to keep your eyes protected!
Having these on hand will keep the process smooth and efficient. Honestly, running back and forth to find tools can be annoyingly time-consuming, so let’s avoid that!
Disconnecting Power and Removing the Old Panel
Alright, here’s the part where we get hands-on. Before you start messing around with wires, make sure to disconnect the power to your garage door opener. This is not just a step; it’s absolutely essential for your safety. Just like you wouldn’t want to cook without turning off the stove, don’t start this project with live electricity flowing!
Once the power is off, it’s time to remove the old control panel. Use your screwdriver to take off any screws holding it in place. If there are wires connected, gently pull them away, noting which wire goes where. You can even take a picture to help you remember for later—new technology comes in handy!
Pull the panel out carefully. If it’s stuck, try wiggling it a bit. Once it’s free, look for any signs of damage, like burnt or frayed wires. This can help you understand why it failed in the first place.
Installing the New Control Panel
Now comes the exciting bit: installing the new panel! Take your replacement control panel and prepare it for installation. If you’ve taken a photo of the old one, now’s the time to pull it up and reference it.
Start by connecting the wires to the new panel, matching them just like in your photo. Here’s the thing: if you mess this up, you could run into some serious issues down the line. Make sure you’re connecting each wire securely. If you want to ensure a safer connection, wrap them with some electrical tape after connecting.
Next, use your screwdriver to secure the new panel in place. Once it’s mounted properly and feels sturdy, you’re ready for the next step!
Reconnecting Power and Configuration
Time to reconnect the power! Head over to your garage door opener, plug it back in, and hold your breath for a moment. If everything went well, you should see your new control panel light up. Take a moment to appreciate your handiwork—you’re already halfway through!
Now it’s time for some configuration. Depending on your model, you might need to sync your remote control with the panel. This process usually involves pressing a button on the opener and then on the remote. Allow a few moments for them to recognize each other. Voila! You should hear a little beep or see a light, indicating a successful sync.
Don’t forget to test out the controls on your panel. Check the door operation, light buttons, and any additional features. If something seems off, you might need to revisit those connections.
Troubleshooting Common Issues
Let’s face it—sometimes, despite your best efforts, things don’t go as planned. If your new LiftMaster control panel isn’t functioning as expected, don’t get discouraged. Here’s a step-by-step guide for troubleshooting:
1. Check the Power Connection: Make sure the power is connected to your garage door opener and that the outlet is functional.
2. Review the Wiring: Double-check that all connections are secure and in the right places.
3. Reset the System: Sometimes, you may need to reset your remote and the control panel. Consult your LiftMaster manual for guidance on how to do this.
4. Inspect for Damage: Look for any visible signs of damage or malfunction in your new panel or old wiring.
Troubleshooting can be frustrating, but it’s just a part of the process. Keep a level head, and you’ll usually find a solution.
Final Thoughts on Replacing Your Control Panel
Replacing your LiftMaster control panel is a pretty achievable DIY project, especially when you break it down into manageable steps. With just a few tools and some patience, you can have a new setup that works seamlessly with your garage door system.
Remember, it’s perfectly normal to run into some bumps along the way. Whether it’s a hiccup in the installation or the need for troubleshooting, the key is to stay calm and be willing to learn. Replacing a control panel is like revamping a room in your home; it takes a bit of effort, but seeing everything come together is incredibly satisfying.
Now you can hit that button with confidence, knowing your garage door is just a click away from opening smoothly. Good luck, and happy DIYing!