If you’ve got a specific remote type, like one from LiftMaster or Chamberlain, don’t worry. The installation process is similar across brands, so you won’t feel lost, even if you’re picking up a new remote for your setup. Let’s dive into the nitty-gritty of how you can install this gadget yourself, step by step!
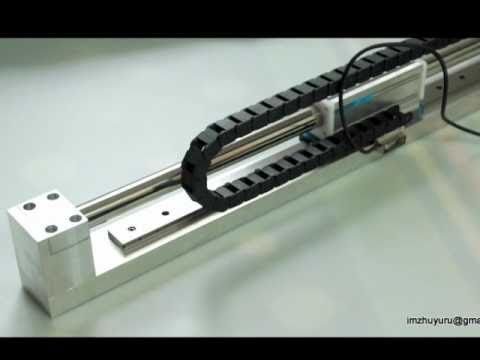
What Is a Linear Motor Unit?
Think of a linear motor unit as the heart of your garage door opener. It’s what makes the door move up and down, and it does this with linear motion instead of the rotational energy you might find in other setups. Essentially, it converts electrical energy directly into linear movement, allowing for more precise control over the door’s action. This technology is especially useful for creating smooth, quiet openings.
Here’s a visual: imagine pulling a drawer open as smoothly as possible. That’s how a linear motor unit helps your garage door glide up and down quietly and fluidly—no loud grinding noises to worry about. If you’re tired of those old chain or belt systems that rattle and make your door feel clunky, you’ll appreciate the upgrade to a linear motor unit.
Gather Your Tools and Materials
Before you begin this installation project, you’ll want to ensure you have all the necessary tools and materials at hand. Preparation is key! Here’s a quick checklist of what you’ll need:
- Linear motor unit kit (make sure it’s compatible with your door)
- Screwdriver (flathead and Phillips)
- Drill
- Level
- Measuring tape
- Safety glasses
Having the right tools makes the job easier, and makes it less likely that you’ll find yourself running to the hardware store mid-installation. If you’re missing any tools, go ahead and grab those first. Trust me, no one wants to get halfway through a project and realize they can’t continue!
Remove the Old Opener and Prepare the Door
Now, it’s time to get your hands a bit dirty. First things first, you need to disconnect any power to the old opener to ensure safety while you work. This means unplugging it from your outlet or disconnecting the battery if it’s a battery-operated model.
Next, take the old opener off the garage door. This typically involves unscrewing a few bolts and carefully detaching it. Remember, it’s easier with a buddy, as garage door openers can be bulkier than they seem. Once you’ve removed the old unit, check the door’s hardware. Ensure everything, like rollers and tracks, is in good shape and ready to work with your new linear motor unit.
Install the Linear Motor Unit
Getting to the exciting part! Now that you’ve prepped your door, it’s time to install the linear motor unit. Follow these steps closely:
1. Position the Motor: Place the linear motor unit according to your manufacturer’s instructions, often at the center of the garage door. Ensure it’s aligned correctly with your door’s mechanism.
2. Secure It: Use the screws provided in your kit to attach the motor unit securely to the mounting brackets. Remember to use the level to confirm it’s straight—no one wants a crooked garage door!
3. Connect the Power: This step varies by model, but generally, you will connect the power wires from the motor to your power source. If you’re unsure, consult the installation manual.
4. Attach the Door: Connect the linear motor to the garage door using the linkage provided. Make sure it’s properly hooked to avoid any failures.
Make sure to double-check every connection. You wouldn’t want to play troubleshooting games with faulty wiring later!
Set Up the Remote and Sync Everything
Once you’ve got the linear motor unit installed, it’s time to make sure you can operate it with your remote. Most modern setups use a remote system for convenience.
1. Insert Batteries: If your remote needs batteries, make sure you’ve got fresh ones installed. This is crucial for ensuring a seamless connection.
2. Pair the Remote: Look for the “pair” button on your linear motor unit. Press it, and then press the corresponding button on your remote. Honestly, it’s usually just a matter of timing—press them slightly in succession.
3. Test the Remote: After pairing, it’s time to put it to the test. Stand inside the garage, hit the remote button, and watch that door glide up or down. If it works, great! If not, you may need to reset or troubleshoot.
Don’t forget, if the remote isn’t connecting, check for common issues like dead batteries or interference from other electronics.
Troubleshooting Common Issues
Even when you follow all the steps to the letter, things can occasionally go awry. Here’s a couple of common problems you might encounter with your new linear motor unit and how to address them:
– Door Won’t Move: If the motor doesn’t seem to work at all, double-check your power connections. Ensure that everything is plugged in and that the outlet is functioning.
– Remote Not Working: If your remote isn’t pairing or functioning, it might be a dead battery or an issue with the pairing process. Try resetting the remote and the motor, then redo the pairing steps.
– Unusual Noises: If you hear grinding or unusual sounds when the door operates, it could be misalignment. Check your installation carefully; a slight misstep can lead to big problems down the line.
Diagnosing these issues can feel overwhelming, but remember, it’s just a process of elimination. You’re going to get it right!
Final Thoughts on Your Installation Journey
Congratulations! You’ve successfully installed your linear motor unit. Now, you can enjoy the effortless convenience of raising and lowering your garage door with just the press of a button. It’s like having a personal assistant that opens your garage without any fuss.
Remember, anytime you have a question or face an issue, referring back to your manual or reaching out for help is always a sound approach. Enjoy the quiet ease of your new system, and don’t hesitate to show it off to family and friends. After all, who wouldn’t be impressed by a DIY garage door installation? Happy parking!