Skylink is known for its reliable garage door openers, and adding a battery backup is a smart move for anyone who values convenience and security. In this guide, you’re going to learn how to install a Skylink battery backup with easy, step-by-step instructions. Whether you’ve tackled DIY projects before or this is your first venture, I’ve got you covered.
Gather Your Tools and Materials
Before diving in, it’s important to gather all the tools and materials you’ll need. This ensures you won’t have to run back to the store halfway through the installation. Honestly, having everything at your fingertips makes the process a lot smoother. Here’s what you’ll typically need:
- Skylink battery backup unit
- Compatible garage door opener (if you’re unsure, check the manual)
- Basic tools (like a screwdriver, pliers, and a wrench)
- Wire connectors (if not included in the backup kit)
- Safety goggles
Make sure you have a clean workspace as well. Lay out your tools neatly so you can easily grab what you need. Now that you’re set up, let’s get started!
Safety First: Preparing for Installation
Before you start, take a moment to ensure everything is safe. Garage door openers can be dangerous if handled improperly, so keep these safety tips in mind:
- Disconnect the garage door opener from the power source to avoid electric shock.
- Wear safety goggles to shield your eyes from any flying debris.
- Read the instruction manual for your specific Skylink model to understand the integration process.
Taking a few precautions can save you a lot of headaches later. Once you’re certain everything is safe, you’re ready to move on to the next step.
Remove the Cover from the Garage Door Opener
Now it’s time to open up the garage door opener. You’ll need to carefully remove the cover to access the wiring. This can be as simple as unscrewing a few screws. Here’s a step-by-step:
1. Locate the screws on the side or bottom of the opener.
2. Use your screwdriver to gently unscrew them and keep them somewhere safe.
3. Carefully lift off the cover and place it aside.
You should now see the internal wiring. This is where you’ll connect the battery backup. If it’s your first time, don’t fret—just take it slow!
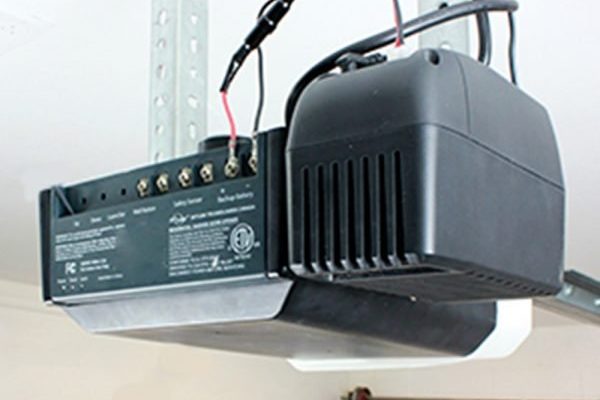
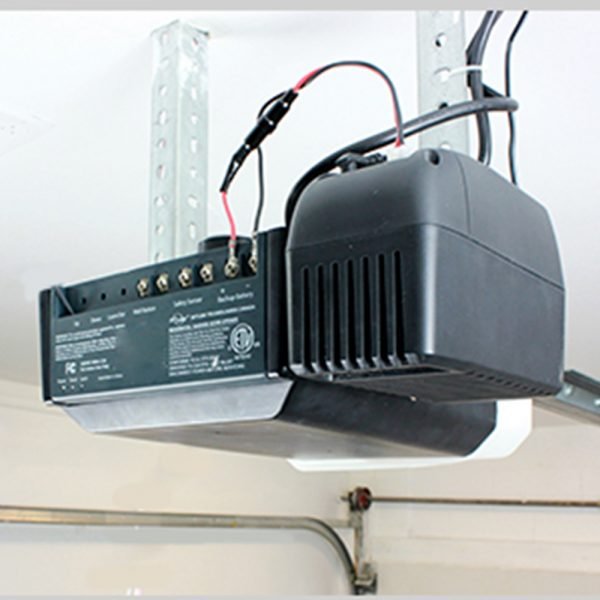
Connecting the Battery Backup
With the cover removed, you’re ready to connect the battery backup. Here’s how to do it:
1. Identify the Battery Connection Terminals: Look for the battery terminals inside the garage door opener. They’re usually labeled.
2. Connect Wires: If your battery backup comes with wires, you’ll need to connect them to these terminals—one wire to the positive (+) terminal and the other to the negative (−) terminal. Make sure you’re connecting the right wires, as this is crucial for the battery to work properly.
3. Use Wire Connectors: If necessary, use wire connectors to ensure secure connections. This minimizes the risk of any accidents.
Make sure to double-check your connections once you’ve done this. You might be wondering about the importance of proper connections—poor connections can result in the battery not working or even damaging your opener.
Reattach the Cover
After everything is securely connected, it’s time to put the cover back on the garage door opener. Here’s a quick refresher:
1. Align the cover with the opener body.
2. Insert the screws you removed earlier and tighten them gently.
3. Ensure there’s no loose fitting; everything should sit snug.
Not only does this step protect your internal components, but it also saves you from potential accidents down the line.
Test the Garage Door Opener
With the installation complete, it’s crucial to test the garage door opener to ensure the backup battery works correctly. This is like the final check in any DIY project. Here’s how to do it:
1. Reconnect Power: Plug the opener back into the power source.
2. Simulate a Power Outage: You can simply unplug the opener to see if the battery backup kicks in.
3. Observe Operation: If the garage door opens and closes smoothly without power, congratulations! You’ve successfully installed your Skylink battery backup.
If something doesn’t work as expected, retrace your steps. Make sure to check all the connections and ensure the battery is charged. Troubleshooting is normal in DIY projects!
Maintenance Tips for Your Battery Backup
After you’ve installed the battery backup, keeping it well-maintained is important for long-term performance. Think of it like tuning up your car—regular checks can prevent future issues.
1. Regular Checks: Periodically test the battery backup by simulating power outages every few months.
2. Inspect Connections: Look for any frayed wires or loose connections and rectify them if necessary.
3. Keep Clean: Dust and debris can interfere with the operation, so keep the garage door opener area clean and clear.
These maintenance steps can extend the life of your battery and ensure your garage door works seamlessly when it matters the most.
Installing a Skylink battery backup isn’t just about convenience; it’s about ensuring peace of mind. With a little patience and these straightforward steps, you’ve taken a smart step to keep your garage door functional during power outages. Treat it as an investment in your home’s security and safety. If you ever run into issues, remember that troubleshooting is part of the process.
As you enjoy the benefits of your newly installed battery backup, know that you’re always improving your DIY skills. Keep on tackling projects with confidence!
Originally posted 2025-02-20 11:49:28.