The Craftsman brand, known for its reliable garage door openers and accessories, provides an easy way to enhance your door’s functionality. Whether you’re working with a traditional Craftsman opener or one of their newer models, getting those safety sensors installed can make all the difference. So, let’s dive into the process of installation so you can have your garage door running smoothly and safely again.
Understanding Your Craftsman Safety Sensors
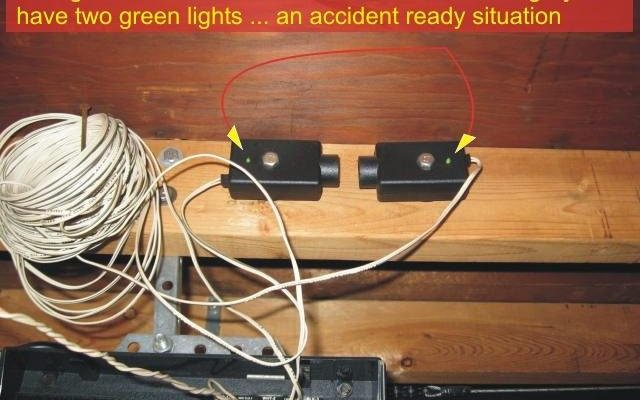
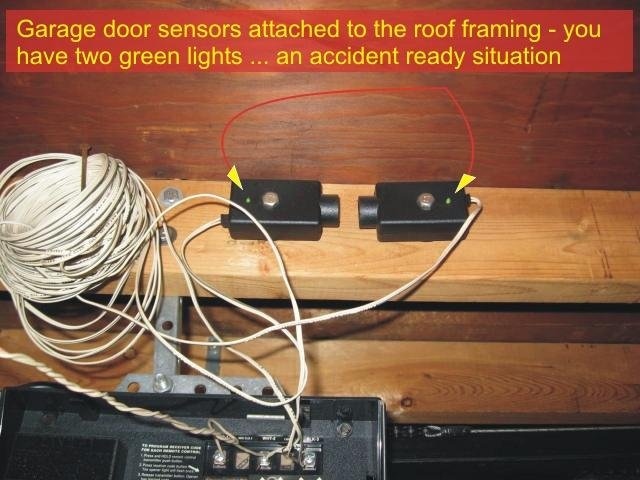
Before you grab your tools, let’s clarify what these safety sensors are and how they function. Safety sensors are two small devices usually placed near the bottom of your garage door tracks. They work together to communicate with one another: one sensor sends a signal to the other, essentially saying, “It’s safe to go down.” If something—or someone—interrupts this signal while the door is closing, the system reverses, preventing injury or damage.
What happens if these sensors aren’t working properly? You might find that your garage door won’t close at all, or it reverses mid-cycle. In simpler terms, if your garage door acts like a stubborn toddler when it’s time to close, there’s a good chance the safety sensors are the culprit! Now, let’s look at how to get these clever little gadgets installed.
Gathering Your Tools and Materials
You’re going to need a few tools to get started on this project. Luckily, it’s not a major equipment haul! Here’s a quick list of what you’ll need:
- Craftsman safety sensor kit (includes both sensors and mounting hardware)
- Screwdriver (most likely a Phillips head)
- Wire cutters (if you need to trim wires)
- Tape measure (to position the sensors perfectly)
- Level (for setup precision)
Having these tools ready will not only speed up the install process but also make you feel more prepared. Picture your workspace: neat and organized. This will help you tackle the installation like a pro!
Removing the Old Sensors (If Needed)
If your old sensors aren’t functioning, you’ll want to remove them before installing the new ones. Don’t worry; it’s quite straightforward. First, disconnect the opener from the power supply to ensure safety. You wouldn’t want the door inadvertently moving while you’re working!
Start by locating the old sensors. They’ll be near the bottom of the door tracks. Use your screwdriver to remove any screws holding them in place and gently detach the wires from the connectors. If you’re feeling adventurous, take a moment to trace where the wires connect—this way, you’ll have a better idea of where the new sensors should hook up.
Installing Your New Craftsman Safety Sensors
Once you’ve removed the old sensors, it’s time for the fun part: installing your brand-new Craftsman safety sensors! Begin by unboxing your new safety sensor kit. Inside, you should see two sensors, one marked for the sender (usually with a red LED) and one for the receiver.
1. Mount the Sensors: Use your tape measure to determine where to place the sensors. They should be no higher than six inches off the ground. Secure them to the garage wall, aligning them neatly with a level.
2. Connect the Wires: After both sensors are mounted, connect the wires to the corresponding terminals. The sender sensor usually has two wires colored red and white, while the receiver is often paired with the same colors. Make sure the connections are snug and secure!
3. Check Alignment: Here’s the key part: the two sensors need to face each other directly. You might even want to use a friend to stand on one side while you adjust the other sensor. This alignment is crucial for the sensors to communicate effectively—they need to “see” each other clearly.
Testing Your New Sensors
After all that hard work, it’s time to test your sensors to see if they’re working correctly. Reconnect the power to your garage door opener and press the remote to close the door. Stand clear and watch what happens. If the door stops and reverses when something interrupts the sensor beam, congratulations! You’ve installed your Craftsman safety sensors successfully.
If the door doesn’t respond correctly, it might be time to double-check the alignment once more. An uneven setup can sometimes lead the system to think there’s no obstacle. You might also want to inspect any loose wires or connections; those sneaky little details can derail an otherwise perfect installation!
Troubleshooting Common Issues
Even with the best intentions, sometimes things don’t go according to plan. If your safety sensors are acting up after installation, here’s a quick troubleshooting guide to help you out:
– Misalignment: If the door doesn’t close and the sensors are bright, check the alignment again. Even a slight angle can affect performance.
– Obstruction: Make sure nothing is blocking the sensors—dust, spider webs, or even small tools can interrupts the signal.
– Wiring Issues: Loose or damaged wiring can cause havoc. Inspect the wiring connections to ensure they’re tight and not frayed.
Don’t fret if things aren’t perfect right away. Even seasoned DIYers encounter hiccups now and then. Just take your time, and you’ll have everything sorted out in no time!
Final Thoughts on Your Craftsman Safety Sensor Installation
Installing Craftsman safety sensors might seem like a chore, but it’s a vital task that ensures your garage door operates safely. Plus, it gives you a nice sense of accomplishment once you see the door operate smoothly! Remember, good installation means less hassle down the road and a safe environment for your family and belongings.
If you find yourself in need of assistance or more advanced troubleshooting, don’t hesitate to reach out for professional help. After all, it’s always better to be safe than sorry—right?
Now that you know how to install Craftsman safety sensors, you’re equipped to make your garage door safer and smarter. Celebrate your success, and enjoy your enhanced garage space with confidence!