You might be wondering how difficult this installation will actually be. Honestly, with the right tools and a little guidance, you can have your Genie opener up and running in no time. Let’s roll up our sleeves and dive into the specifics, ensuring you feel totally empowered through the process.
Gathering Your Tools and Materials
Before diving into the installation, let’s make sure you have everything you need right at your fingertips. No one wants to be halfway through a project only to discover they’re missing an essential component.
- Tools Needed:
- Drill and drill bits
- Wrenches
- Screwdrivers (both Phillips and flathead)
- Ladder
- Measuring tape
- Materials:
- Genie garage door opener kit (make sure it includes everything)
- Mounting brackets (often included)
- Cables and connectors
- Safety sensors (if not already built into the unit)
Here’s the thing: having everything ready reduces frustration. Clean your workspace and ensure your garage door is also in good condition. If it’s squeaky or won’t open smoothly, you might need to address that first.
Understanding the Components of Your Genie Opener
Getting to know the various parts of your Genie garage door opener is like prepping for an exam. Each piece serves a vital function and knowing them will make installation feel more intuitive.
Start with the motor unit, which is mounted on the ceiling. This is the powerhouse of your garage door opener — it’s what drives the door up and down. Next is the rail assembly, which directs the door as it moves. It’s important to ensure this is aligned correctly for smooth operation. Then we have the mounting brackets and safety sensors. The sensors are critical because they prevent the door from closing if something is in the way, keeping your pets and kids safe.
Lastly, you’ve got your remote control. This little gadget is your magic wand, allowing you to command your door from the comfort of your car. Familiarizing yourself with these parts will make the installation process a lot smoother.
Preparing Your Garage Door for Installation
Before you can attach the Genie opener, it’s essential to ensure that your garage door is ready. Think of this step as preparing the canvas before painting a masterpiece.
Check that your door is functioning properly. You should be able to manually open and close it without any hassle. If your door is heavy or gets stuck, consider lubricating the tracks or adjusting the springs. A smooth door is crucial for your new opener to work effectively.
Next, clear the area beneath the door. It’s like setting up a workspace—no one wants clutter getting in the way. Also, ensure that there’s enough room for the motor unit to be mounted securely on the ceiling. Measure the height and plan accordingly; you’ll want your opener to be at least 7 feet from the floor if possible.
Mounting the Motor Unit
Now we’re getting into the fun stuff! Let’s get that motor unit mounted. First, grab your ladder and find a suitable location on the ceiling, ideally centered above the door.
Start by using your measuring tape to determine the height and ensure it’s not too close to any obstructions. Mark the spots where you’ll drill holes for the mounting brackets. Drill holes according to the instructions in your Genie garage door opener kit, and then securely attach the motor unit with the brackets.
You’ve scaled your ladder like a pro! Just don’t forget to double-check the tightening of screws and bolts; these ensure stability when the door operates.
Installing the Rail Assembly
With the motor mounted, it’s time to attach the rail assembly. This is the backbone of your garage door opener, directing the door as it moves.
Carefully follow the installation instructions that come with your opener. Typically, you’ll need to attach the rail to the motor unit and connect it to the garage door itself. Make sure there are no gaps. A well-aligned rail means the door will move smoothly, preventing annoying hiccups down the road.
While attaching, you may need to adjust the tension and length of the rail. This is critical because it affects how the door will lift and lower. As you work, envision the entire garage door system as a cohesive team, all parts working together efficiently.
Connecting the Safety Sensors
Safety sensors are an essential part of your Genie garage door opener. They act like guardians, ensuring no one gets hurt as the door moves up and down. Installing these sensors is simple but very important.
Position the sensors on either side of the garage door, typically around six inches above the floor. As you prepare to mount these, check your owner’s manual for detailed placement instructions. Once positioned, connect the wiring to the main unit, ensuring the wires are protected from any moving parts.
After installation, test the sensors by attempting to close the door while something (like a broom handle) is in the way. If the door reverses and doesn’t close, congratulations, you’ve done a great job! This is a crucial safety feature that can save you from costly repairs or accidents in the future.
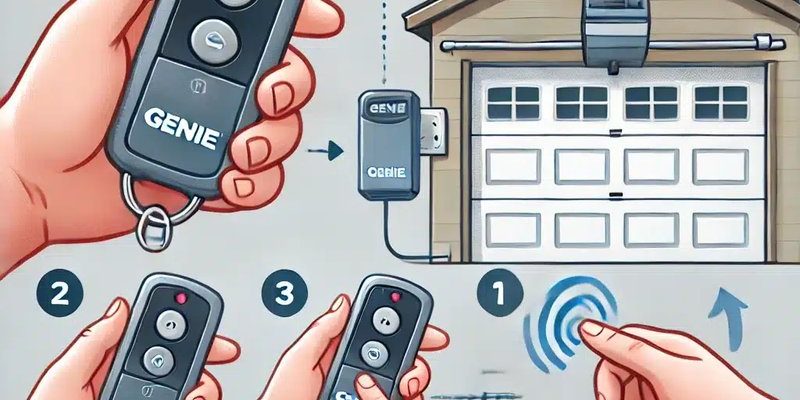
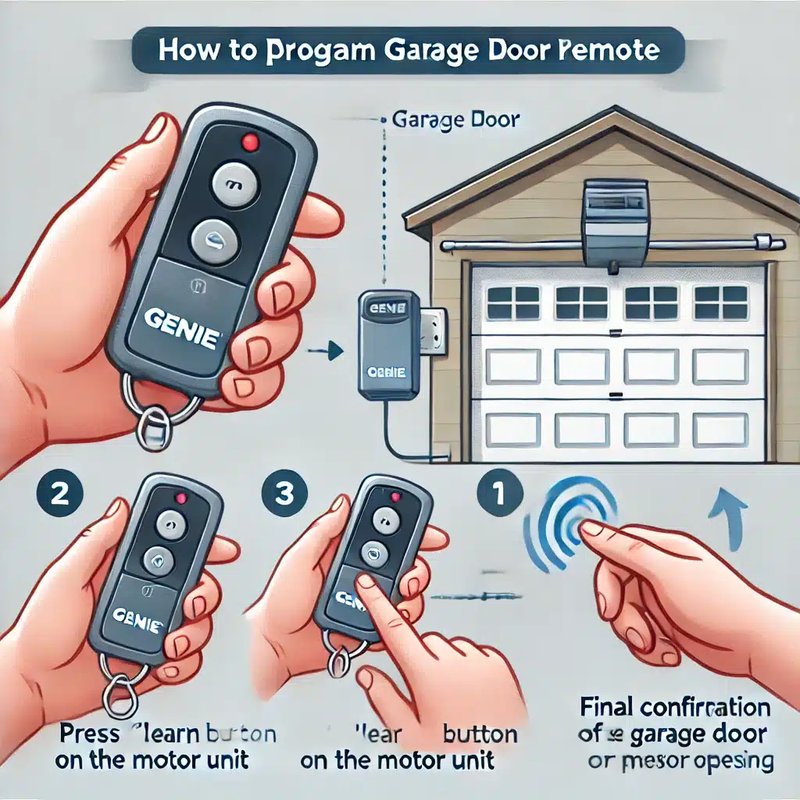
Programming the Remote Control
Now that the hard work is done, it’s time to make your garage door opener truly yours by programming the remote control. This is like adding the finishing touch to a project.
Start by locating the programming button on the motor unit. Press this button, and then within 30 seconds, press the button on your remote. You should hear a click or the lights on the unit may blink, confirming a successful sync. If it doesn’t work the first time, don’t worry. Just try again or consult the instruction manual for troubleshooting tips.
For some Genie models, you can also program multiple remotes, which is convenient for families. It’s always nice to have options!
Testing and Troubleshooting Your Genie Garage Door Opener
After everything is set up, it’s time to test your hard work. Stand back and press the remote button. You should see that door glide open smoothly, almost like magic!
However, if the door doesn’t respond or behaves erratically, don’t panic. Here are a few troubleshooting steps to consider:
1. Check Power Supply: Ensure your power outlet is working properly.
2. Inspect Connections: Look over all wiring to make sure nothing is loose or disconnected.
3. Reset the Opener: If nothing seems to work, consider performing a reset. You can usually do this by finding the reset button on the motor unit and following the instructions in your manual.
By taking the time to test and troubleshoot, you’re making sure your system will run smoothly for years to come.
Congratulations, you’ve successfully installed your Genie garage door opener! With just a small investment of time and effort, you’ve enhanced your home’s convenience, securing it one button press at a time.
Now you can enjoy the ease of a garage door that responds perfectly to your remote. Remember, maintaining your door will ensure it continues to operate smoothly. Every now and then, check the tracks, lubricate the moving parts, and pay attention to your safety sensors.
This is how you take the chaos out of garage access, transforming it into a seamless part of your routine. Just like that, you’ve transformed your garage door experience. Enjoy the functionality and safety your Genie garage door opener brings to your home!