LiftMaster is known for its reliable garage door openers, and with their various models and technologies, they can fit just about any need. From chain drive to belt drive units, each has its benefits. If you’ve decided on a LiftMaster unit and you’re ready to install it, I’m here to walk you through the steps. So, grab your toolbox, roll up your sleeves, and let’s get started!
Gathering Your Tools and Supplies
Before you dive into the installation, it’s crucial to gather all the necessary tools and supplies. Having everything on hand will make your work smoother and quicker. Here’s a list to kickstart your preparation:
- LiftMaster motor unit
- Power drill
- Screwdriver (flathead and Phillips)
- Measuring tape
- Level
- Ladder (if needed)
- Safety glasses
- Socket wrench
- Stud finder
Having these tools ready can save you a lot of time running back and forth. Honestly, nobody wants to be halfway through an installation process only to realize they’re missing a screwdriver!
Preparing Your Garage Door and Existing Opener
Next up, let’s talk about clearing the way for your new LiftMaster motor unit. First off, ensure that your garage door is in good working condition. Check for any broken springs or cables—sometimes, these can be overlooked, but they’re crucial for your door’s functionality.
After that, if you currently have an old opener installed, you’ll need to remove it. This usually involves disconnecting it from your door and removing it from the mounting bracket. Make sure you unplug it from the power source before doing any work. Consider this the “before picture”—once you clear out the old unit, you’ll be ready to showcase the new one!
Installing the Mounting Bracket
Once you’ve got your area ready, it’s time to start installing the mounting bracket. This piece is crucial because the entire motor unit will hang from it. Begin by locating the center of your garage door and mark it. Use your measuring tape to find the upper section of the door—around 3 to 4 inches from the top is typical.
Now, grab your stud finder and locate a suitable support stud in the ceiling. This is where you’ll anchor the bracket. Once selected, use a power drill to secure the mounting bracket in place. Make sure it’s level because that will affect how the motor unit functions up there. Trust me, if it’s crooked, you’ll know it as soon as you start using the door!
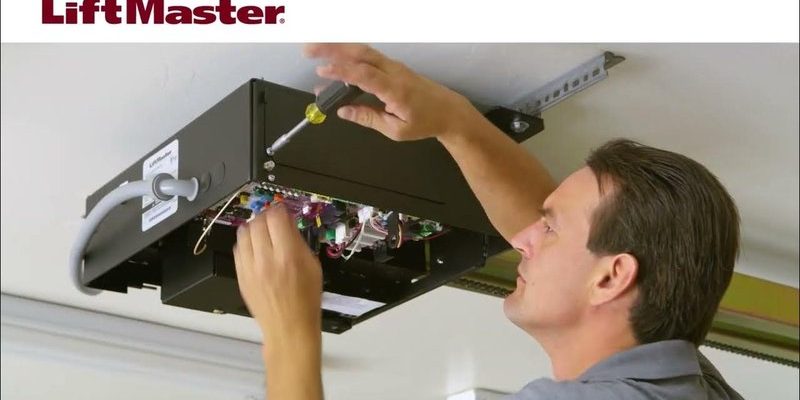
Assembling and Hanging the Motor Unit
Now it’s time for the main event—the motor unit itself! Carefully take your LiftMaster motor unit out of the box and consult the manual. Each model may have slight variations in assembly, so it’s crucial to follow your unit’s specific instructions.
You’ll generally need to attach the drive arm to the motor head. This is where you connect it to the garage door. Be sure to use the correct size screws and make everything secure. Once you’re ready, lift the motor unit into position and hang it on the previously installed bracket.
Make sure to have a helper if you can—they can hold it in place while you secure it. Just like putting a puzzle together, each piece must match perfectly for things to work smoothly.
Connecting the Power and Safety Sensors
Alright, we’re getting closer! Now it’s time to connect the power source. Plug your motor unit into the electrical outlet nearby. If your unit comes with a surge protector, now’s the time to set it up. Safety first, right?
Next, you’ll install the safety sensors. These sensors are important because they prevent the door from closing if something is in the way. Position them about six inches from the ground on either side of the garage door. Use your level to ensure they’re even. This small step can save you a lot of headaches later, as improperly calibrated sensors can cause the door to malfunction.
Syncing the Remote Control
Now, let’s get that remote control to work with your newly installed LiftMaster motor unit. Start by locating the “Learn” button on the motor unit—this typically is found on the back or side of the unit. When you press this button, you’ll usually see a light blink.
Now, grab your remote and press the button you want to sync. You should see the light on the motor unit blink again, confirming that the remote is connected. It’s a lot like pairing a Bluetooth device—simple when you know the steps!
Testing and Troubleshooting Your New Motor Unit
Before you wrap things up, it’s essential to test the entire system to ensure everything is functioning properly. Start by using the remote to open and close the garage door a few times. Listen for any unusual noises or vibrations, and watch how smoothly the door moves.
If you encounter any hiccups, don’t panic! Common issues include the motor unit not responding, the sensors not aligning, or the door not closing all the way. If this happens, recheck your connections and make sure the sensors are correctly aligned. You might need to reset the motor unit—simply unplug it for a minute and plug it back in.
Final Touches and Maintenance Tips
Congratulations, you’ve successfully installed your LiftMaster motor unit! Now it’s time for a few final touches. Take a moment to tidy up your workspace and double-check that all screws and components are securely fastened. Make sure you have the user manual handy for future maintenance tips.
Speaking of maintenance, give your new opener some love by checking the gears and chain regularly. Keep track of when to lubricate moving parts—this helps ensure smooth operation. Also, watch for any debris around the garage door that could interfere with the sensors. A little proactive care can go a long way!
In closing, installing your LiftMaster motor unit doesn’t have to be a daunting task. With the right tools, a clear blueprint, and this handy guide, you can enjoy the satisfaction of a job well done. Plus, being able to open and close your garage door with the push of a button is a pretty nice perk, wouldn’t you agree? Happy DIYing!