In this DIY tutorial, we’ll walk through step-by-step on how to adjust those travel limits on your garage door opener. Whether you have a LiftMaster, Genie, or another brand, the basics are pretty similar. Grab your toolbox, and let’s dive in!
Understanding Garage Door Opener Travel Limits
Before we jump into the how-to, let’s talk about what travel limits are and why they matter. The travel limit settings tell your garage door opener how far it should move when either opening or closing. If these settings are off, your door might not close all the way, leading to safety issues or potential damage.
Most garage door openers have separate settings for lifting and lowering. Adjusting these ensures that the door doesn’t slam down too hard or stop short, which can be a pain (and a hazard). It’s like making sure your car’s windshield wipers work just right: not too fast and not too slow.
Gather Your Tools
Before you start tinkering with your garage door opener, you’ll want to gather the necessary tools. Here’s what you’ll need:
- A screwdriver (flathead and Phillips)
- A ladder (if necessary to reach the opener)
- A tape measure to check door height
- A pencil for marking adjustments
Having your tools ready will make the process smoother and more efficient. You wouldn’t want to climb halfway up that ladder only to realize you forgot something—trust me, I’ve been there!
Identifying Your Garage Door Opener Type
Before making any adjustments, you should identify your garage door opener type. Knowing whether you have a chain drive, belt drive, or screw drive system is crucial since the adjustment method might differ slightly.
– Chain Drive: This type uses a metal chain to lift the door. It’s usually the most cost-effective but can be louder than other options.
– Belt Drive: Quieter than chain drives, these use a rubber belt. They are ideal if noise is a concern.
– Screw Drive: This type has fewer moving parts, making it low-maintenance but can be less reliable in extreme temperatures.
Finding out which you have is usually as simple as looking for the name or model number on the unit.
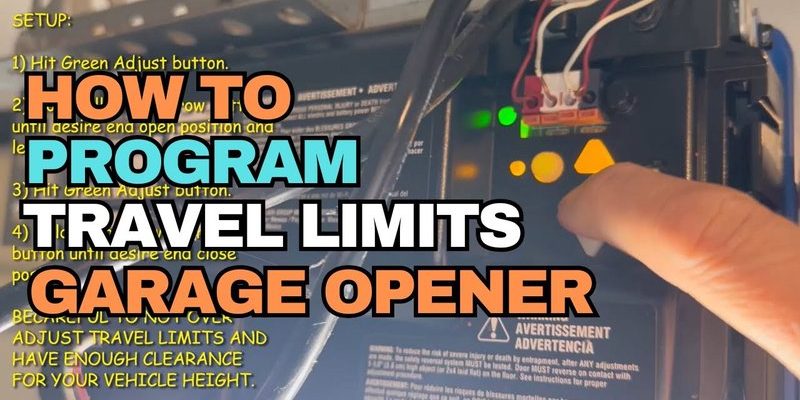
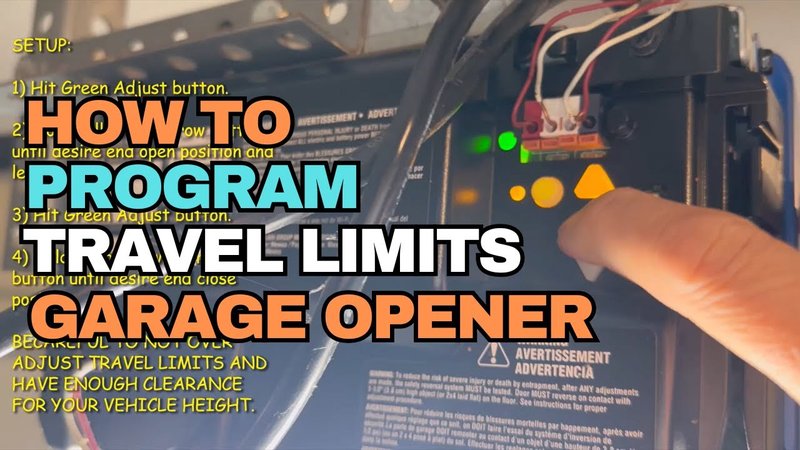
Locating the Travel Limit Screws
Once you’ve got your tools and identified your opener, it’s time to locate the travel limit screws. These are typically on the back or side of your garage door opener unit. Most models will have two screws, labeled “up” and “down.”
Here’s a quick tip: if you’re unsure where these screws are, reference your opener’s user manual. The manual can provide detailed images that will help you identify them accurately.
Preparing to Make Adjustments
Before you start making any adjustments, it’s a good idea to test your garage door. Open and close it manually while watching how it behaves. Does it stop too soon when opening, or does it inch past the point when closing?
Understanding these behaviors will help you determine how much to adjust the limit screws. You might even want to jot down your observations. Having a roadmap of what’s happening can guide you through the adjustment process more smoothly.
Making Adjustments to the Travel Limits
Now for the fun part—making the adjustments!
1. Adjust the Up Limit: If your door doesn’t open fully, turn the “up” screw clockwise to increase the travel. Each turn will usually adjust the door by a few inches.
2. Adjust the Down Limit: If the door closes but doesn’t reach the ground, turn the “down” screw clockwise to bring that limit closer to the floor. Make small adjustments, checking frequently to see how it affects the door’s motion.
Remember, only adjust a little at a time! It’s better to take small steps and test frequently rather than making too big of an adjustment all at once.
Testing Your Adjustments
After you’ve made your adjustments, it’s time to test the garage door. Close it and watch carefully to see if it reaches the ground fully. If it stops short again, don’t worry—repeat the adjustment process until it’s just right.
Open the door fully and ensure it doesn’t bounce back. If it does, forego those few extra instructions we discussed, and back off slightly on the “up” limit until your door opens smoothly.
Fixing Common Issues
If you’re still experiencing problems after adjusting the limits, a few common issues might be at play. Here are a few possibilities to consider:
– Obstructions: Check for anything getting in the way of the door. Even small items can trip the safety sensors.
– Worn Tracks: If the track is dirty or has debris, it might cause the door to misalign.
– Broken Springs: If the springs are damaged, they produce uneven lifting, which can confuse the travel limits.
Addressing these issues head-on can save you a ton of headaches down the road!
Maintaining Your Garage Door Opener
After you’ve adjusted your travel limits, regular maintenance can go a long way. Here are a few simple tasks to keep your garage door functioning well:
– Lubricate moving parts: Use garage door lubricant to keep things moving smoothly.
– Check the sensors: Make sure they’re aligned and free of dirt.
– Test the remote: Changing the battery in your remote every so often is a good practice.
A little upkeep now can prevent major issues later.
Adjusting your garage door opener travel limits doesn’t have to be daunting. With a bit of guidance, the right tools, and a keen eye, you can easily make your garage door function like new. It’s much like tuning an instrument; it might require a little adjustment here and there, but once it’s in harmony, everything flows beautifully.
Remember, safety is key! If you start feeling overwhelmed or uncertain, don’t hesitate to call in a professional. You want that garage door to work flawlessly and, most importantly, safely. Happy DIYing!