Garage door remotes can come in various shapes and sizes, and some popular brands like Chamberlain, LiftMaster, and Genie might be familiar to you. Even though they have their quirks, the battery replacement process is usually straightforward. So, grab your tools (or just a new battery) and let’s dive in!
Understanding Your Garage Door Remote
Before diving into the battery replacement steps, it’s essential to understand a bit about your garage door opener remote. The remote communicates with your garage door opener unit, usually mounted on the ceiling of your garage. When you press a button, it sends a signal to the opener, telling it to open or close the door. If you’re having trouble, it might simply be the battery; let’s not jump to replace the entire unit just yet!
Different Types of Remotes
Most garage door remotes use either 9-volt or CR2032 batteries, although this can vary by brand. Some might even require specialty batteries. It’s important to check your remote’s user manual or the back of the remote itself for the specific battery type. Knowing what type you need will save you time and frustration during this process.
Gather Your Tools
Before you get started on replacing your garage door opener remote battery, you’ll need a few basic tools. Don’t worry, these aren’t complicated tools; most likely, you already have them around the house. Here’s a quick list:
- A new battery (check the type, as mentioned earlier)
- A small screwdriver or a coin (useful for unscrewing or prying open the remote)
- A little patience
You might be wondering, “Do I really need a screwdriver?” Well, it depends on your remote’s design. Some remotes have screws, while others are designed to pop open conveniently. These tools will help make the battery swap as painless as possible.
Opening the Remote
Now that you’ve gathered your tools, it’s time to open the remote. Here’s how to do it:
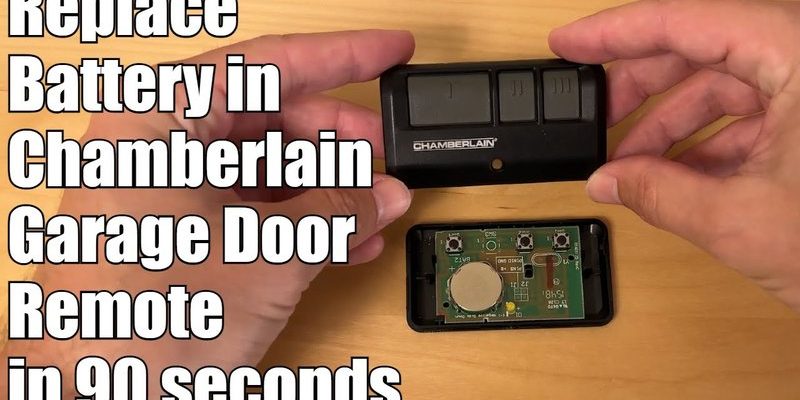
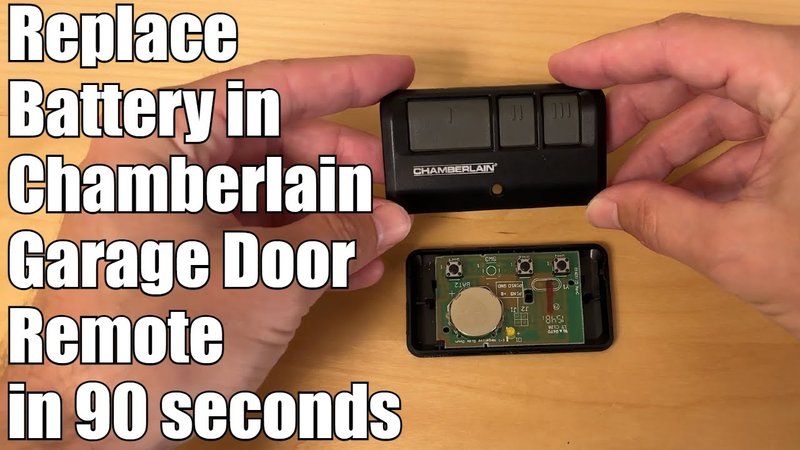
1. Identify the Opening Mechanism: Look at the back of the remote. If you notice any screws, grab your screwdriver. If there are no visible screws, see if the remote is designed to slide apart. Many newer models just pop open with a little pressure.
2. Remove the Cover: If you have screws, carefully remove them and set them aside so they don’t roll away. If there are no screws, gently pry the cover open using your finger or a coin. Be cautious not to apply too much pressure to avoid breaking the casing.
3. Note Battery Orientation: Before you remove the old battery, take note of how it’s positioned inside the remote. This will help you place the new battery in the exact same way.
Removing the Old Battery
Alright, you’re almost there! Now it’s time to remove the old battery.
– Gently Extract the Battery: Using your fingers, carefully pull the battery out of its compartment. If it’s stuck, wiggle it slightly from side to side to loosen it.
– Dispose of the Old Battery Responsibly: Once removed, make sure to dispose of the old battery properly. Many grocery stores and retailers have recycling programs for batteries, so check your local options.
Inserting the New Battery
Now comes the rewarding part: inserting the new battery! Follow these steps to ensure it’s done right:
– Position the New Battery: Take your new battery and line it up with the terminal connections inside the remote. Remember that one side is positive (+) and the other is negative (−). Most batteries will have a marking indicating which side is which.
– Press It In: Gently press the battery into place. You’ll hear a slight click when it fits snugly. Don’t force it; if you’re struggling, double-check the orientation.
Closing the Remote
With the new battery securely in place, it’s time to close the remote:
1. Reattach the Cover: If your remote had screws, align the cover back with the remote body and replace any screws you removed. Again, be careful not to over-tighten, as this can damage the casing.
2. Snap It Shut: If it’s a snap-on cover, press it firmly until you hear it click into place. Again, ensure it’s centered and aligned correctly.
Testing Your Remote
Everything’s back together, now let’s see if it works! Testing your remote is a crucial step, and here’s how to do it:
– Stand Clear of the Garage Door: Safety first! Make sure you’re standing at a safe distance away from the door when you test the remote.
– Press the Button: Give that button a press. If all goes well, your garage door should respond. If it doesn’t, don’t panic just yet.
Troubleshooting Common Issues
If the door doesn’t open, here are a few things to check:
– Battery Orientation: Double-check if the battery is installed correctly.
– Remote Sync Issues: Sometimes, remotes need to be synced with the garage door opener. Refer to your remote’s manual for specific instructions on how to do this.
– Obstructions: Ensure that nothing is interfering with the signal between the remote and the garage door opener, such as walls or heavy objects.
Maintenance Tips for Your Remote
Keeping your garage door remote functioning well goes beyond just changing batteries. Here are some quick maintenance tips:
– Keep It Clean: Regularly wipe the remote to remove dust and grime. This can help maintain good battery connections.
– Avoid Dropping: If possible, keep your remote safe from falls or hits that could damage internal components.
– Store in a Safe Place: Designate a spot for your garage door remote. If you know where it is, you won’t misplace it when you really need it!
When to Consider a New Remote
There might come a time when a battery replacement won’t cut it anymore. Here are some signs it’s time for a new remote:
– Frequent Battery Changes: If you find yourself changing the battery often, there might be an underlying issue.
– Physical Damage: Cracks or severe scratches can hinder the remote’s function.
– Inconsistent Operation: If the remote works erratically even with new batteries, it might be failing and could need replacement.
Replacing your garage door opener remote battery doesn’t have to be a headache. With just a few simple steps and a couple of tools, you can tackle this task on your own. Not only does this save you time, but it also helps ensure that you’re in control of your garage access. Remember, keeping everything in good working order is part of being a responsible homeowner. So, the next time your remote starts acting up, you’ll know exactly what to do! Happy DIYing!