Resetting your Skylink Smart Hub isn’t as daunting as it sounds. In fact, it’s a straightforward process, much like hitting the refresh button on your browser when a webpage gets stuck. With a few simple steps, you’ll have your smart hub back up and running in no time, ready to manage all your devices smoothly.
Let’s dive into the steps and methods for resetting your Skylink Smart Hub, ensuring your smart home system operates as efficiently as possible.
Why Reset Your Skylink Smart Hub?
You might be wondering why you’d need to reset your Skylink Smart Hub in the first place. There are several common scenarios that might warrant a reset:
- Connection issues: If your devices aren’t responding, a reset can help re-establish communication.
- Device changes: Adding or removing devices often requires a reset for proper syncing.
- Software updates: Sometimes, updates can cause glitches that a reset may fix.
- Performance problems: If the hub is running slow or erratically, resetting can often clear any unwanted bugs.
Think of it this way: resetting is like giving your hub a fresh start. It clears out cobwebs and starts the process anew, which can lead to smoother operation and better performance.
Preparing to Reset Your Skylink Smart Hub
Before diving into the actual reset, there are a few things you should check and prepare:
1. Identify the Model: Have your specific Skylink Smart Hub model on hand. Different models might have slight variations in the reset process.
2. Gather Your Remote: Make sure you have your Skylink remote handy, as you’ll need it for certain reset steps.
3. Back Up Your Settings: It’s wise to note any important configurations or device names, as a reset may clear everything.
4. Ensure Power Supply: Double-check that your hub is plugged in and has power.
By preparing ahead, you can ensure a smoother reset process. It’s like packing your bag before a trip—having everything organized makes for a much easier journey!
How to Perform a Soft Reset on Skylink Smart Hub
A soft reset is often the first go-to option because it’s quick and can resolve minor issues without wiping your settings. Here’s how to do it:
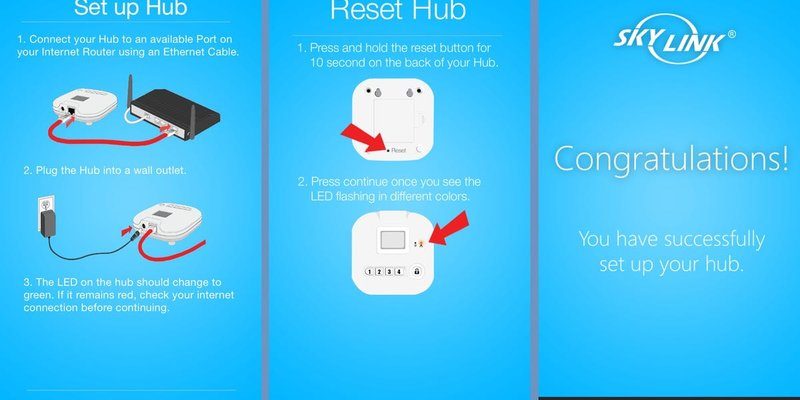
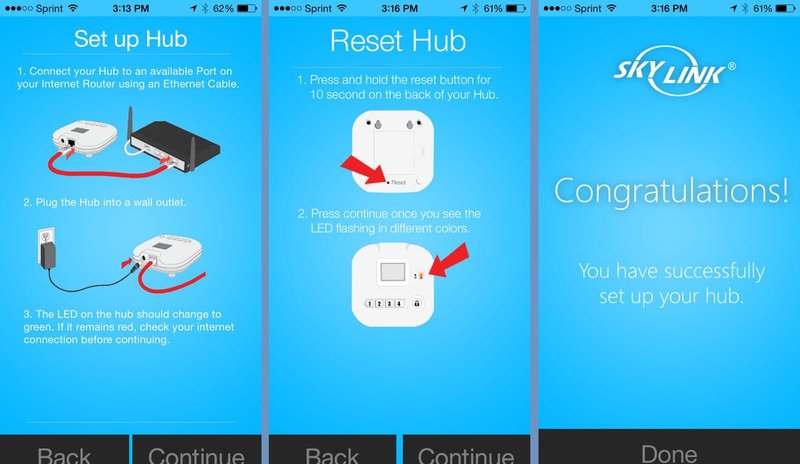
1. Locate the Reset Button: Look for a small reset button on the back or bottom of the hub. You might need a paperclip or pin to press it.
2. Press and Hold: Using your tool, press and hold the reset button for about 10 seconds. You might notice the lights on the hub blinking—this is a good sign!
3. Release the Button: After 10 seconds, release the button. The hub should restart automatically.
This method is effective for minor tweaks and can often resolve connectivity issues without losing your saved configurations.
How to Perform a Hard Reset on Skylink Smart Hub
If a soft reset doesn’t do the trick, you might need to take the plunge and perform a hard reset. This step is more extensive and will return your hub to factory defaults. Here’s how to go about it:
1. Disconnect Power: Unplug your Skylink Smart Hub from the power source.
2. Locate and Press the Reset Button: Just like the soft reset, you’ll still need that reset button.
3. Plug in the Power: While holding down the reset button, plug the hub back into the power outlet.
4. Keep Holding: Continue holding the button until the hub’s indicators flash in a specific pattern (usually about 15 seconds).
5. Release and Wait: Let go of the button and wait for the hub to finish rebooting.
Now your hub is restored to its original factory settings. You will need to reconnect all your devices, which can be a bit of a task, but it often clears out any persistent issues.
Syncing Your Devices After Reset
After resetting, the next step is to get your devices synced back to the hub. Here’s a simple process to follow:
1. Open the Skylink App: If you’re using the app, be sure it’s up to date. It’s your main tool for syncing devices.
2. Follow the Sync Instructions: The app should provide step-by-step instructions to add devices. It often involves putting them in pairing mode, which you can typically trigger by pressing a button on the device.
3. Test the Devices: Once synced, test each device to ensure they’re responding correctly to the hub.
Be patient! Sometimes a device might take a few tries to get recognized, especially if it’s been previously paired with a different system.
Troubleshooting Common Problems
Occasionally, things might not go as smoothly as planned. Here are some troubleshooting tips for common post-reset issues:
– Device Not Found: If a device isn’t connecting, check its battery and ensure it’s in pairing mode. Sometimes, a simple reboot of the device can help.
– Connectivity Issues: Make sure your hub is within range of your Wi-Fi network and that there are no obstructions.
– Firmware Updates: If problems persist, check if there’s a firmware update for your hub that might fix any bugs.
If all else fails, you may want to consult the Skylink customer support for help. You’re not alone in this!
Final Thoughts on Resetting Your Skylink Smart Hub
Resetting your Skylink Smart Hub can seem intimidating at first, but it’s really just a simple process. Whether you’re troubleshooting connection issues or rearranging your smart home ecosystem, knowing how to reset the hub is a valuable skill.
Honesty, we all experience tech problems from time to time. But with these steps, you’ll be able to take control and get things back on track. Remember to be patient when syncing devices afterward—it’s just part of the process!
Hopefully, this guide sheds light on how to reset your Skylink Smart Hub effectively. Now, go ahead, and give it a try! You might be surprised at how easily everything falls back into place.