In this guide, I’ll walk you through the steps to replace a capacitor in a common brand of garage door opener—let’s say a Chamberlain or LiftMaster model, which are popular choices out there. Whether you’re a newbie DIYer or just looking to save some money instead of calling a technician, this article will help you confidently tackle this project.
Understanding the Capacitor in Your Garage Door Opener
Let’s start by understanding what a capacitor actually does. Imagine the capacitor as a small battery inside your garage door opener. It stores electricity and releases it quickly to give that extra power surge—kind of like a turbo boost for your car’s engine. When your garage door opener attempts to lift that heavy door, it pulls a lot of power. Without a functioning capacitor, the motor can struggle or even fail completely.
Why does a capacitor fail? It can happen for several reasons, like age, heat, and general wear and tear. If your garage door opener is older, or if you’ve noticed any strange movements or sounds, it might be time to check the capacitor.
Signs Your Capacitor Might Need Replacement
You might be wondering, “How will I know if my capacitor is bad?” Here are a few signs to look for:
- Inconsistent Operation: If your garage door opener sometimes works and sometimes doesn’t, the capacitor might be at fault.
- Weak Lift: Notice your door moving sluggishly? It should rise and fall smoothly without hesitation.
- Unusual Noises: Sounds like humming, buzzing, or grinding can indicate that the motor is struggling.
- Burning Smell: If you smell anything unusual, it’s definitely a sign that something’s wrong and should be addressed immediately.
Recognizing these symptoms early can save you a headache down the line. If you notice one or more of these issues, it’s time to inspect that capacitor.
Gathering Your Tools and Parts
Before diving into the replacement process, you’ll need to gather some tools and parts. Here’s what’s typically required:
- New capacitor (make sure it’s compatible with your opener!)
- Multimeter (for testing the old capacitor)
- Screwdrivers (usually Phillips and flathead)
- Wire cutters or strippers
- Gloves (for safety)
Finding the right capacitor is crucial. You can usually find this information in your garage door opener’s manual or online. If you’ve got the model number, that can simplify your search significantly.
Safety First: Disconnecting Power
Before you start poking around, safety should be your number one priority. First things first, you need to disconnect the power to the garage door opener. Depending on your setup, here’s how you can do that:
1. Unplug the Opener: Find the power cord and simply unplug it from the outlet.
2. Turn Off the Circuit Breaker: If unplugging is not an option, locate the circuit breaker for your garage and turn it off.
3. Verify Power Is Off: Use a multimeter to ensure there’s no power running to the garage door opener.
This step is critical because working with electrical components can be dangerous. Trust me, it’s better to be safe than sorry!
Removing the Old Capacitor
Now that you’re safely set up, it’s time to remove the old capacitor. Follow these steps carefully:
1. Access the Opener’s Housing: Depending on your model, you may need to remove screws to detach the cover of the garage door opener.
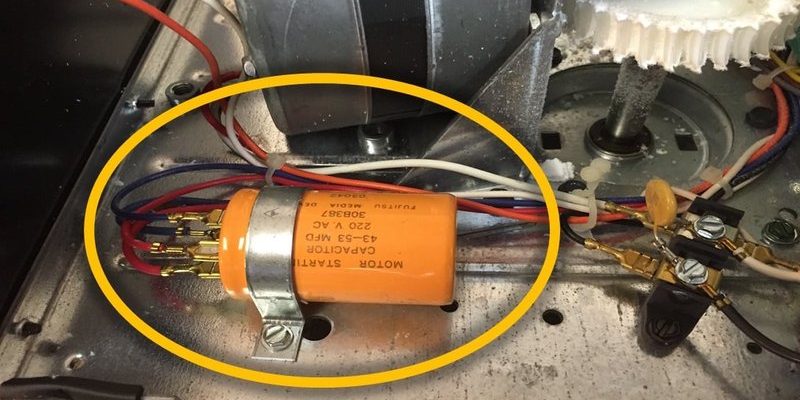
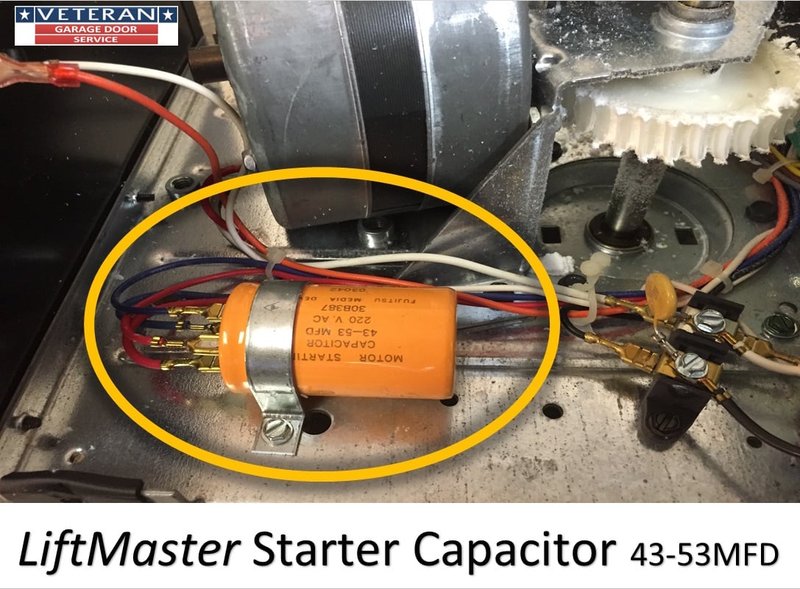
2. Locate the Capacitor: Once the housing is open, find the capacitor. It’ll usually be a cylindrical object, often mounted on or near the motor.
3. Disconnect the Wires: Take a picture or make a note of how the wires are connected before detaching them from the old capacitor. Use a screwdriver to loosen the connectors if needed.
4. Remove the Capacitor: With the wires detached, you can pull the capacitor out of its mount.
It’s important to do this step slowly and carefully. Take your time to avoid mixing up the wiring.
Testing the Old Capacitor
Before throwing that old capacitor away, it’s a good idea to test it using your multimeter. This step can clarify whether the issue was indeed with the capacitor or if there’s something else going on. Here’s how:
1. Set the Multimeter: Set the multimeter to capacitance mode (often represented by “C” or a capacitor symbol).
2. Connect Probes: Attach the multimeter probes to the respective terminals of the capacitor.
3. Read the Measurement: The reading should be close to the rated capacitance written on the capacitor itself. If it’s way off or zero, the capacitor is definitely toast.
If the old capacitor checks out, your issue might lie elsewhere, and you’ll need to do some deeper troubleshooting.
Installing the New Capacitor
Once you’ve tested and confirmed that the old capacitor was the problem, it’s time to install the new one. Follow these steps carefully:
1. Position the New Capacitor: Place it in the same spot as the old one and secure it in place if needed.
2. Reconnect the Wires: Refer to the picture you took earlier and reconnect the wires to the terminals of the new capacitor. Ensure they’re tightly connected.
3. Double-Check Connections: Make sure everything looks good and is securely in place before reassembling the opener.
Closing Up the Opener
Now that the new capacitor is installed, it’s time to put everything back together. Here’s what to do:
1. Replace the Housing Cover: Realign the opener’s housing and secure it with the screws you removed earlier.
2. Check for Loose Wires: Make sure there are no wires pinched or poorly positioned as you close everything up.
3. Reconnect Power: Plug the opener back in or turn on the circuit breaker.
Let’s take a moment here—if you’ve done everything correctly, your garage door opener is ready to go. But wait, we’re not done yet!
Testing the Garage Door Opener
After everything is back together, it’s time to see if your hard work paid off. Here’s how to test it:
1. Use the Remote: Try opening the garage door using the remote control to see if it responds correctly.
2. Observe the Operation: Make sure the door moves smoothly and without any strange noises. If it works flawlessly, congratulations!
3. Manual Switch: If you have a wall button, try it too. Confirm that all methods of operation function as they should.
If everything runs smoothly, give yourself a pat on the back! You just completed a DIY project that many folks might shy away from.
Common Troubleshooting Tips
If your garage door opener still isn’t working correctly, don’t despair! Here are a few troubleshooting tips:
- Check the Power Source: Ensure the outlet is working and that you’ve securely grounded everything.
- Inspect Wires: Look for any damaged or loosely connected wires.
- Consider Other Components: Sometimes, motors and other parts might also be malfunctioning.
Patience is key here. If you still can’t figure it out, reaching out to a professional could save you a lot of time and fuss.
Wrapping It Up
Replacing a garage door opener capacitor can feel intimidating, but it’s very achievable with a little time and patience. From gathering your tools to testing everything at the end, you’ve worked through the process step-by-step. Not only have you saved money by doing it yourself, but you’ve also gained a sense of accomplishment.
Remember, the next time your garage door acts up, take a moment to consider the capacitor. With this knowledge, you’re ready to tackle this issue head-on. Happy DIYing!