Before diving into the nitty-gritty, it’s worth noting that LiftMaster has many models, and the reset process might vary slightly. However, the fundamental principles remain pretty much the same across their lineup. So grab yourself a cup of coffee, and let’s talk about how to get your garage door opener back in sync.
Why You Might Need to Reset Your LiftMaster
Before we dive into the reset process, let’s chat about why you might find yourself needing to reset your LiftMaster motor unit. Taking a moment to understand the “why” can really help clarify the “how.”
You might be wondering what could go wrong. First off, if your remote control suddenly stops working, it could be an issue with the synchronization between the remote and the motor unit. Sometimes, the system experiences technical hiccups, just like we occasionally reboot our computers when they freeze.
Another common reason is changing the battery in your remote or adding a new remote to your setup. When you replace or add remotes, the system might need a little nudge to sync up. This is where learning how to reset your LiftMaster comes in handy. By resetting the system, you can clear out any old settings that might be interfering with the connection.
Gathering Your Tools
Before you start the reset process, let’s gather everything you’ll need. Don’t worry; it’s not like preparing for a big project. You likely have everything on hand. Here’s your quick checklist:
- Your LiftMaster remote: Make sure it’s nearby and the batteries are fresh. If the battery is dead, no amount of resetting will help.
- A ladder: If your motor unit is installed on the ceiling, a ladder will help you reach it safely.
- Your user manual: It’s a great idea to have it handy, especially for model-specific instructions.
With these tools at your side, you’re ready to tackle the process. Think of it like gathering the ingredients before baking a cake—having everything ready makes the job so much easier!
Steps to Reset Your LiftMaster Motor Unit
Now let’s get down to the meat of the matter: resetting your LiftMaster motor unit. Here’s a step-by-step guide that you can follow along with.
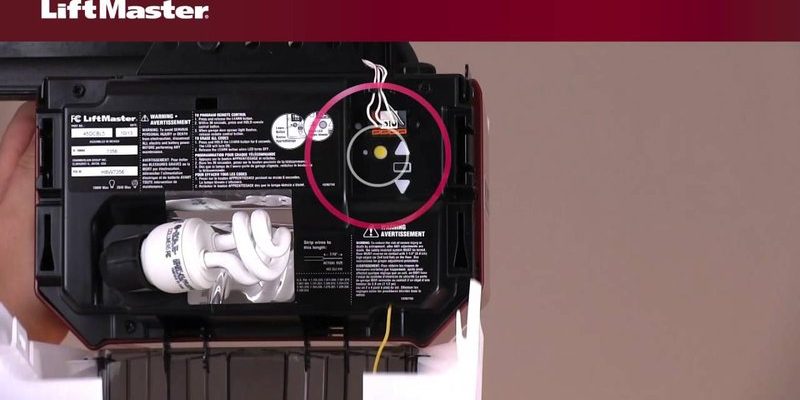
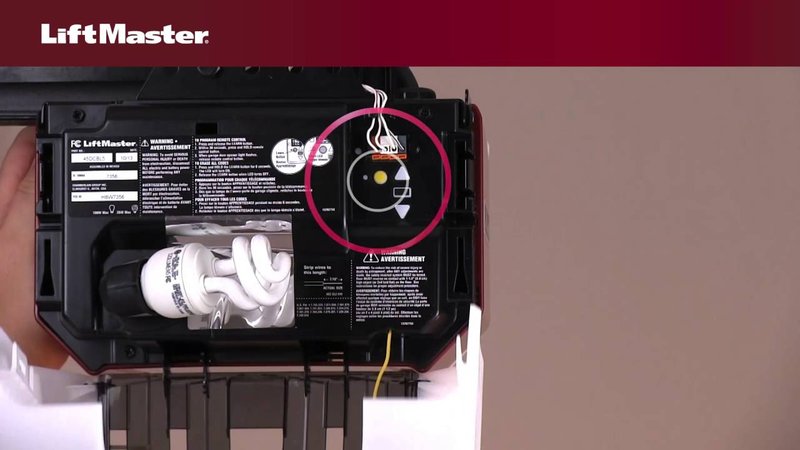
Step 1: Locate the Reset Button
First things first—find the reset button on your LiftMaster motor unit. Typically, this button is located on the back or the side of the unit. It may be labeled as “Learn,” “Program,” or simply “Reset.”
Once found, give yourself a moment to ensure the unit is powered on. If you see indicator lights, you’re on the right track!
Step 2: Press the Reset Button
Now comes the action part. Press and hold the reset button for about 15 seconds. After this, you should see the indicator light blink or change color, signaling that it’s ready for a reset.
Remember, you’re essentially clearing out previous settings. It’s like turning off all the notifications on your phone to start fresh—only now, you’ll have to set up your remotes again.
Step 3: Reprogram Your Remotes
After the unit has been reset, it’s time to reprogram your remotes. Here’s how to do it:
1. Press the reset button again briefly; the indicator light should turn on.
2. Within 30 seconds, press and hold the button on your remote that you want to program.
3. When the light on the motor unit blinks or turns off, you’ve successfully paired that remote.
If you have multiple remotes, repeat this step for each one. Easy, right?
Step 4: Test the System
Once all remotes are programmed, it’s time for the big test. Stand back a little, press the button on your remote, and watch your garage door spring back to life!
If it opens and closes smoothly, congratulations! You’ve successfully reset your LiftMaster motor unit. If it doesn’t work, don’t panic just yet.
Troubleshooting Common Issues After Resetting
Sometimes, you might run into bumps even after following the reset steps. Here are a few common issues and quick fixes:
- The remote won’t sync: Double-check that the new batteries are installed correctly. If there’s still no response, try resetting the motor unit again and reprogramming.
- The door won’t open or close: Ensure that nothing is physically blocking the door. If the motor light is blinking, it might suggest a safety sensor issue.
- Battery issues: If the remote struggles to connect consistently, consider changing the batteries again. Sometimes, even a new battery can be faulty.
Remember, troubleshooting is just part of the journey. Treat it like a puzzle you’re trying to solve.
Alternatives to Resetting Your LiftMaster
If you find resetting your LiftMaster motor unit often, you might start to wonder if it’s time for an upgrade or alternative. Here are a couple of thoughts to consider:
– Universal Remotes: If you frequently struggle with your existing remote, investing in a universal garage door remote could be a good idea. They’re typically easy to program and can save you hassle in troubleshooting.
– Smart Garage Door Openers: If you like staying ahead of technology, smart garage door openers are a fun option. These allow you to control your garage door via a smartphone app, leading to fewer sync issues in the first place.
While these alternatives are definitely options, it’s worth giving your current system a solid reset before deciding to make changes. You might find it works just fine after a little TLC.
Wrapping It Up
Resetting your LiftMaster motor unit might sound daunting at first, but it’s a pretty straightforward process. By following the steps in this guide, you can troubleshoot issues and get your garage door opener back in working order.
Always remember to keep your user manual handy for specific details about your LiftMaster model. In the end, maintaining your garage door opener isn’t just about functionality; it’s about security and convenience.
Now you’re armed with the know-how to reset your LiftMaster motor unit! If you need to do it again in the future, just think of the steps we’ve talked about. You’ve got this!