Most garage doors, whether you’re using a Chamberlain, LiftMaster, or Genie, come equipped with a built-in light that illuminates the garage when the door opens or closes. However, the default settings might not fit your needs perfectly. Fortunately, adjusting your garage door opener’s light timer can enhance your experience and add a little more convenience to your daily routine. So, let’s dive in and discover how to make this little tweak yourself!
Understanding Your Garage Door Opener’s Light Timer
Before we jump into the steps to adjust the light timer, it helps to have a solid understanding of what the light timer actually does. Simply put, the light timer controls how long the garage door light stays on after you activate the door. If you’re just getting started, imagine this as a countdown timer that gives you a few moments of light to get settled after you come home.
Most models allow you to set the light duration anywhere from 1 to 5 minutes. The default time is usually around 2 minutes, but this can vary by brand and model, so double-check your owner’s manual for specifics. Having the right light timer setting ensures that you won’t be fumbling in the dark or wasting electricity unnecessarily.
The light is handy for safety and convenience. You might be wondering why you’d need to adjust it at all—maybe your garage is bigger than average, or you’re frequently in there searching through boxes for seasonal decorations. Knowing how to customize this simple feature can make your garage feel a lot more user-friendly.
Preparation for Adjusting the Light Timer
Before you start tweaking settings, it’s important to gather the right tools and information. Here’s what you need to have on hand:
- Your garage door opener remote
- The owner’s manual for your specific model
- A small screwdriver, if your unit requires opening
- Patience and a little bit of elbow grease!
Finding your owner’s manual should be your first step. If you’ve misplaced it, you can often find a PDF version online on the manufacturer’s website. This will guide you through the specific adjustments for your model, including any unique features or quirks it might have.
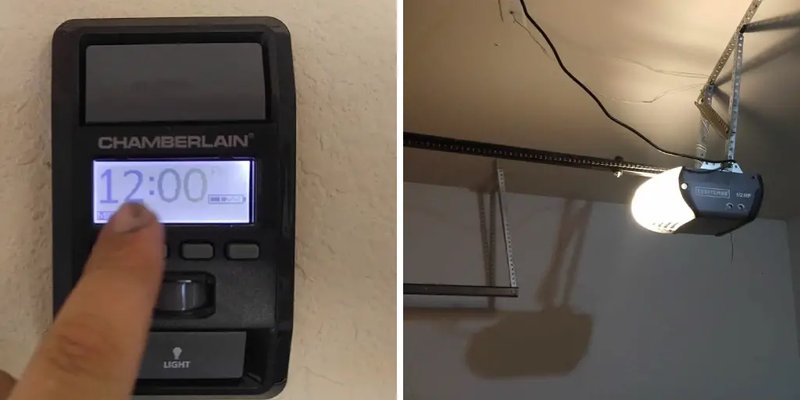
It’s also a good idea to familiarize yourself with the control panel of your garage door opener. This panel is usually mounted on the wall inside your garage. Take a quick peek at it; knowing what buttons do what can make the entire process smoother.
Accessing the Settings of Your Garage Door Opener
Now that you’ve prepared, let’s access the settings of your garage door opener. Most models will have a small section on the back or front where you can access the settings. Here’s what you’ll usually need to do:
1. Locate the control panel: This is where you’ll find the buttons and settings for your garage door opener.
2. Identify the light timer settings: Depending on your model, this could be labeled clearly or might require you to press a few buttons to cycle through the options.
3. Open the panel if necessary: Some models have a cover that you’ll need to remove to access the adjustments. Grab that screwdriver if you need it!
Once you’re in there, you might spot a dial or set of buttons that allow you to adjust your settings.
Adjusting the Light Timer
Now comes the fun part: actually adjusting the light timer! Here’s how you can do this step by step:
1. Power on the unit: Ensure your garage door opener is plugged in and operating.
2. Locate the light timer settings: As mentioned before, look at the specified section in the control panel.
3. Modify the timer: Use the designated buttons or dial to increase or decrease the time your light will stay on.
For example, if you find that 2 minutes isn’t enough, consider bumping it up to 3 or 4 minutes instead.
4. Save the settings: Many models will have a “save” button to confirm your new setting. Make sure you press it, or it may revert to the old timer.
5. Test the new setting: Close the garage door and see if the light stays on for the adjusted period the next time you open it.
If your adjustments were successful, you should notice a difference right away!
Common Issues When Adjusting the Light Timer
Like any DIY project, you may run into some bumps along the way. Here are a few common issues you might encounter and how to handle them:
– The timer isn’t changing: If the light timer won’t adjust, try resetting the garage door opener. To do this, locate the reset button on your model, hold it until the light blinks, and then try again.
– Unexpected behavior: If the light remains on longer than expected, double-check the settings. It’s easy to accidentally turn the dial or push the button multiple times without realizing it.
– Light flickering: If your light flickers instead of staying on, ensure your bulbs are securely screwed in. It could also indicate a need to replace the bulbs if they’re older or malfunctioning.
Troubleshooting these issues shouldn’t take long. Remember, it’s all part of the learning process!
Understanding Light Bulb Compatibility
You might not think about it often, but the type of bulb you use in your garage door opener can affect the light timer as well. Most openers are compatible with various bulbs, but not all.
Here’s what to consider when selecting bulbs for your garage door opener:
– LED vs. Incandescent: LED bulbs are energy-efficient and have a longer lifespan, but some garage door openers might not be compatible with them. Always check your manual.
– Wattage: Make sure the wattage of your bulb doesn’t exceed what the opener can handle. Most models specify this limit.
– Dimmability: If you prefer dimmer lights, look for dimmable bulbs that can work with your garage door opener.
Choosing the right bulb can improve the performance of your garage door opener and ensure the light timer functions as intended.
Using a Universal Remote
If you’re using a universal remote to control your garage door opener, you’ll want to keep in mind that the process might slightly differ. Universal remotes typically require a syncing procedure. Here’s a general idea of how to sync it:
1. Find the program button: This is usually on the motor unit.
2. Press the button: Follow the instructions based on your remote to sync it with your garage door opener.
3. Test it: Make sure the remote opens and closes the door correctly and allows you to adjust the light timer.
Keep in mind that some features may not be available with a universal remote, so checking your remote’s manual can be beneficial as well.
Regular Maintenance for Your Garage Door Opener
Now that you’ve got your light timer adjusted, don’t forget that regular maintenance will keep your garage door opener functioning smoothly for years to come. Here are some quick tips to keep in mind:
– Lubricate moving parts: Use a silicone-based lubricant for the rollers, hinges, and tracks.
– Check the balance: Ensure the garage door opens and closes smoothly and stays balanced.
– Test safety features: Make sure the auto-reverse feature works by placing an object in the door’s path.
Routine check-ups will prevent minor issues from turning into major headaches.
Adjusting your garage door opener’s light timer is a small tweak that can make a big difference in your daily routine. With a few straightforward steps, you now know how to extend the time that light stays on, making your garage a safer and more functional space.
Remember, whether you’re looking for that extra moment of light during a late-night tool search or simply want to minimize energy waste, customization is key. As you continue to get to know your garage opener, you’ll find that even minor adjustments can enhance your experience at home. Happy tinkering!