Liftmaster is a well-known brand when it comes to garage door openers, and their remotes are designed to make your life easier. Whether you’ve misplaced the batteries, changed the code, or simply want to start fresh, resetting your remote can usually solve the issue. Let’s dive in and explore how exactly to reset your Liftmaster remote step by step.
Understanding Your Liftmaster Remote
To effectively reset your Liftmaster remote, it helps to know the different types of remotes available. Most Liftmaster remotes come with a few common features. The model number is often found on the back, and that can help you identify the exact remote you have.
Generally, you’ll come across two main types: the standard remote and the mini remote. The standard remote usually has several buttons, while the mini version is more compact and often has a single button for quick access. Knowing your remote type can be crucial when it comes to troubleshooting and resetting.
If your Liftmaster remote is acting up periodically, it might be due to interference from other devices or even a worn-out battery. You might be wondering, “How do I know if it’s the battery?” A quick test is to press any button on your remote. If it doesn’t respond at all, it could be a battery issue. Let’s move on to the steps for resetting the remote itself.
Gathering What You Need
Before you jump into the reset process, it’s helpful to gather a few items so you’re ready. Here’s a handy checklist to make sure you have everything at hand:
- Your Liftmaster remote: Ensure you have the correct one.
- Owner’s manual: If you have it—it’s often useful for specific model instructions.
- Replacement batteries: Make sure you have fresh batteries as needed.
- Access to your garage door opener: You’ll need to get close for the resetting process.
Once you have these essentials ready, you’re set for the next steps. This ensures the process flows smoothly without interruptions. It’s similar to preparing all your ingredients before you start cooking a new recipe. Trust me; it makes a difference!
How to Reset Your Liftmaster Remote: Step by Step
Now let’s get into the meat of the matter. Here’s a simple, step-by-step guide on how to reset your Liftmaster remote:
Step 1: Clear Previous Codes
To start off, you might want to clear any codes that are currently programmed into your garage door opener. Here’s how to do it:
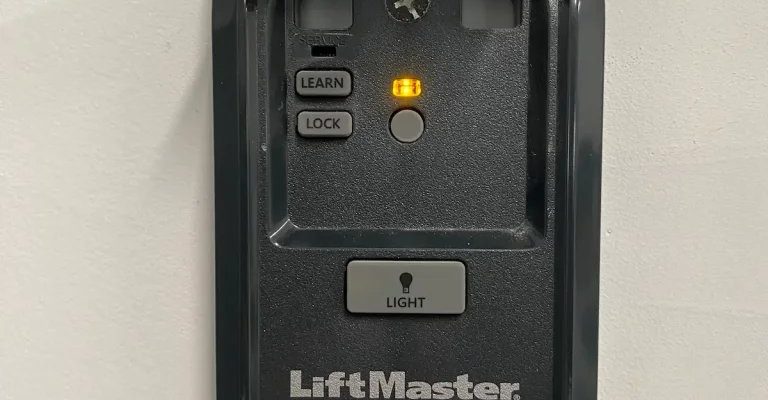
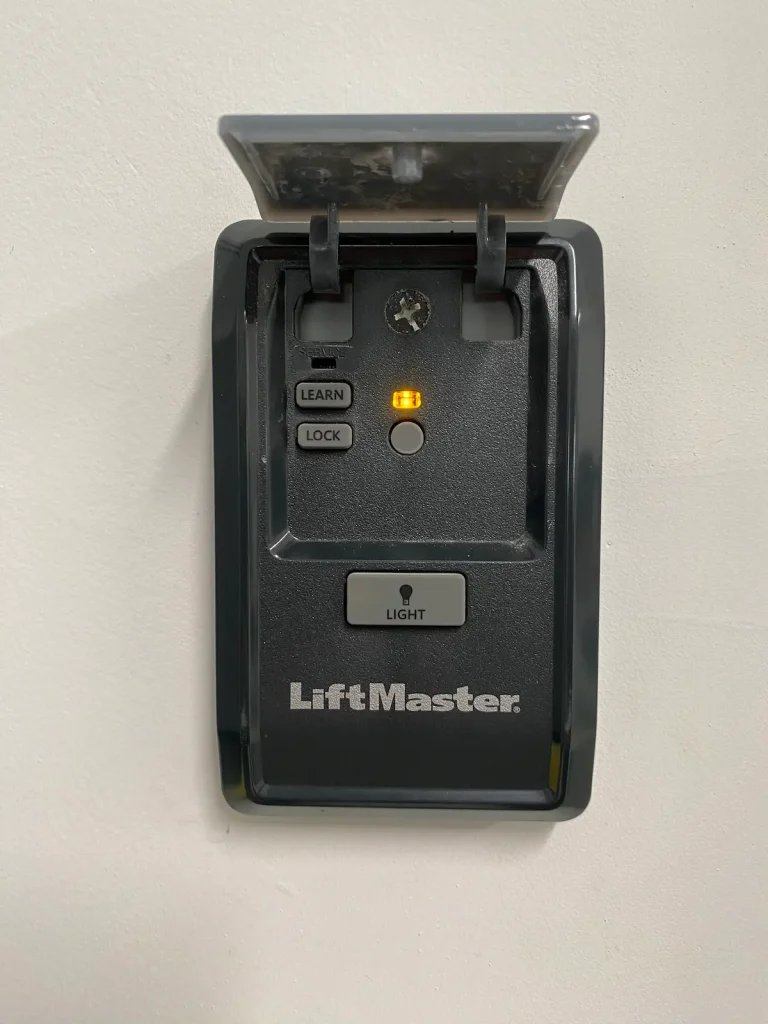
1. Locate the “Learn” button on your garage door opener. This is often found on the back or side of the unit.
2. Press and hold the “Learn” button for about 6 seconds, or until the LED light next to it turns off. This action clears all remotes from your opener’s memory.
Clearing previous codes is an important step because it ensures a fresh start when pairing your remote again. Think of it as wiping the slate clean!
Step 2: Sync the Remote
Now that you’ve cleared the codes, it’s time to sync your Liftmaster remote. Here’s what to do:
1. Press the corresponding button on your remote that you want to program.
2. Follow the instructions: Usually, this means pressing the button on the remote one time while the LED is still glowing next to the “Learn” button.
3. Wait for a response: You should see the light on your garage door opener blink, indicating that the remote has been successfully programmed.
At this stage, your remote and garage door opener are finally communicating. Doesn’t that feel great?
Step 3: Test the Remote
The final step is to ensure everything is working correctly. After syncing, go ahead and test it out:
1. Stand a few feet away from your garage door and click the button.
2. Watch for the door’s response. If it opens or closes, you’ve done it right! If nothing happens, try repeating the syncing process.
Testing the remote can save you from potential headaches later. If it doesn’t work, double-check the battery installation or repeat the syncing process.
Troubleshooting Common Issues
Even after following the steps, sometimes things don’t go as planned. Here are a couple of issues you might encounter and how to handle them:
- Nothing Happens: If your remote still doesn’t work after resetting, check the battery and ensure it’s installed correctly.
- Door Opens Randomly: This might happen if the remote is picking up interference from other devices. Try moving to a different location.
Regular troubleshooting can really help maintain the effectiveness of your Liftmaster remote. If problems persist, it may be a sign to consult the user manual or seek professional help.
When to Consider Alternatives
Sometimes, a reset just won’t cut it. If you’ve tried everything and your Liftmaster remote still isn’t working, it might be time to explore other options. You can consider purchasing a universal remote that can sync with various garage door openers. This could be a worthwhile substitute if you’re using an older model and it’s become obsolete.
You might find that universal remotes offer a blend of convenience and compatibility, allowing multiple devices to work with a single remote. Just make sure it is compatible with your Liftmaster system.
Final Thoughts
Resetting your Liftmaster remote can be an empowering experience, transforming a frustrating day into one filled with relief and ease. Remember, having that garage door at your command not only makes your life simpler but can also add an extra layer of safety to your home.
By following these detailed steps, you can ensure your Liftmaster remote works efficiently to suit your lifestyle. And if something doesn’t go right the first time, that’s normal! Troubleshooting is just part of the tech game. Now, go on and enjoy the convenience of your fully operational garage door remote!