Now, whether you’re using a Chamberlain, LiftMaster, or Genie garage door opener, the steps to reset the logic board can vary slightly. But don’t worry; I’m here to help you navigate through the process. Let’s break it down into simple steps that anyone can follow, even if you’re not the most tech-savvy person on the block.
Understanding the Logic Board
The first thing we should clarify is what a logic board actually does. Think of it as the control center for your garage door opener. It manages everything from the remote signals to the motor functions that lift the door. If your door starts acting funky—like reversing direction unexpectedly or not responding at all—the logic board might be the culprit.
The logic board contains various components, including:
- Microcontroller: This is the brain of the logic board, processing signals from the remote or wall switch.
- Relay: This switch controls the power to the motor that opens and closes the door.
- Calibration Settings: These settings ensure your door operates smoothly and safely.
Grasping this concept helps demystify why resetting the logic board can fix so many problems. It’s like giving your brain a quick reboot after a long day!
Common Symptoms Indicating the Need for a Reset
Before diving into the reset process, it’s helpful to recognize the signs that a reset is necessary. Here are a few common symptoms that might indicate it’s time to hit the reset button:
- Non-Responsive Remote: If your remote is suddenly not working, a reset can often resolve this hiccup.
- Door Reversal: If the door opens but then closes only to reverse, your logic board might need adjusting.
- Delayed Response: If there’s an unusual delay in the door’s opening or closing, a reset may bring things back in sync.
Recognizing these signs can save you time and frustration. Honestly, no one likes to struggle with their garage door, especially after a long day!
Gather Your Tools
Now that you’ve identified the need for a reset, let’s gather a few tools before we get started. You’ll need:
- Screwdriver: This may be useful if you need to access the opener’s logic board housing.
- Step Ladder: If your opener is mounted on the ceiling, you may need to elevate yourself to reach it.
- Owner’s Manual: This will provide specific instructions for your model, which can be invaluable.
Having these items ready will make the process smooth and efficient. Think of it as preparing for a road trip—you wouldn’t hit the road without a map, right?
Steps to Reset Your Garage Door Opener’s Logic Board
Resetting the logic board is easier than it may sound. Depending on the brand of your opener, the steps may slightly vary. Here’s a general method you can follow:
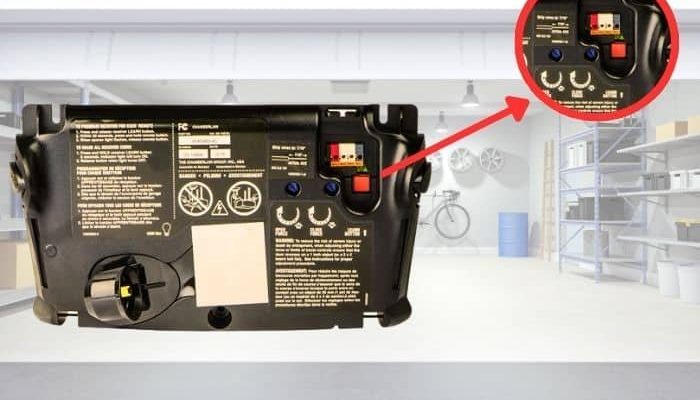
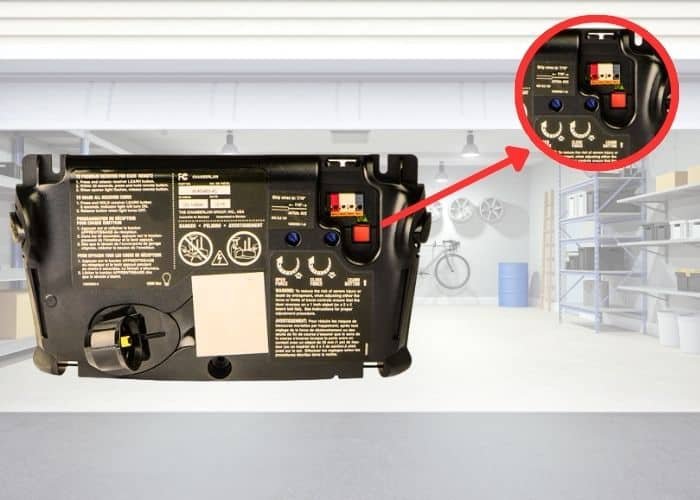
Step 1: Locate the Learn Button
Every garage door opener has a Learn button. This is usually found on the back or side of the motor unit. When you press this button, it signals the logic board to enter programming mode.
Here’s the thing: This button could be colored differently depending on the brand. It can be yellow, purple, or green. So, check your owner’s manual if you’re having trouble locating it.
Step 2: Disconnect Power
Next, unplug the garage door opener from the electrical outlet. This is important for safety and is often the first step in resetting the logic board. If you have a battery backup, ensure that you disconnect that too.
Try to wait about two minutes. This will give the logic board ample time to completely reset its memory.
Step 3: Reconnect Power
After the wait, plug your garage door opener back into the outlet. You should hear a click or see a light indicating that the system is booting back up.
At this stage, give it a moment to stabilize before moving on to the next step.
Step 4: Press the Learn Button
Once everything is plugged in again, it’s time to press that *Learn button* you found earlier. Press it once, and you might see a light start blinking. This is a good sign! It means the logic board is ready to learn new remote codes if needed.
If your garage door opener includes a reset setting, you may need to press and hold the Learn button until the light goes off, indicating a reset.
Step 5: Reprogram Remotes
With the logic board reset, you’ll need to reprogram your remotes. Start by pressing the Learn button again until the light blinks. Then, press the button on your remote that you want to program. You should see the light on the motor unit blink or go off, signifying the remote has been successfully paired.
Don’t forget: You might need to repeat this step for each remote you use.
Additional Tips for Troubleshooting
Even after all this, you might run into issues that a simple reset won’t fix. Here are a few tips to help you troubleshoot further:
- Check the Batteries: Don’t forget to check the remote batteries! A dead battery can often mimic logic board issues.
- Inspect the Sensors: If the door is reversing without a clear reason, ensure that the safety sensors are clean and aligned.
- Look for Obstacles: Ensure nothing is blocking the door’s path; even small objects can cause problems.
These troubleshooting steps can save you a call to a professional.
When to Call a Professional
If you’ve tried resetting the logic board and even troubleshooting doesn’t seem to help, it might be time to call in a pro. Signs that you need expert assistance include:
- Repeated Issues: If reset after reset leads to the same problems, it may suggest deeper issues.
- Strange Noises: Grinding or clunking can indicate mechanical failures needing expert attention.
- Frequent Remote Failures: If the remote fails consistently, there could be extensive damage to the logic board.
Professionals possess the right tools and skills to dive into more complex issues.
Resetting your garage door opener’s logic board can be a straightforward solution to many frustrating problems. It’s like giving your opener a fresh start, allowing everything to click back into place. Remember to be patient throughout the process and follow each step carefully. You might discover that resetting the logic board is all it takes to get your garage door back in working order.
By understanding how the logic board works and recognizing the signs that it needs a reset, you’ll be better prepared to tackle future garage door issues with confidence. And if things still don’t work out, you now know when it’s best to reach out for professional help. Happy resetting!