Here’s the thing: just like with a car, every garage door opener has set parameters that tell it how far to open or close. Sometimes, those settings need a little tweaking. Maybe your door isn’t opening all the way, or it’s slamming shut a bit too aggressively. Don’t worry; adjusting these limit switches can usually fix those issues. So, pour yourself a cup of coffee, and let’s dive into this together.
What Are Garage Door Opener Limit Switches?
Garage door opener limit switches are essential components that tell your garage door how far to travel. Picture them as markers on a racetrack. When your garage door opens or closes, the limit switches signal the motor when to stop. If these switches are out of whack—due to wear and tear, misalignment, or other issues—your garage door will either fail to open or close properly.
These switches can be mechanical or electronic, and they act like checkpoints. The mechanical type might physically touch the door, while the electronic kind relies on sensors. In either case, they have one goal: to keep your garage door functioning efficiently and safely.
How Do Limit Switches Work?
To grasp how limit switches work, think of a light switch. When you flip it on, that’s your cue—just like the limit switches reacting to the movement of your garage door. As the door opens or closes, it reaches a point where it should either stop or reverse direction. That’s where the limit switches step in.
A mechanical limit switch might have a lever that gets pushed as the door moves. When that lever gets pushed down, it sends a signal to the motor to stop the door. On the other hand, an electronic limit switch uses sensors to detect the door’s position, sending signals through a circuit board. Both types work to ensure that your garage door functions consistently.
Why You Should Adjust Limit Switches
Adjusting your garage door’s limit switches can prevent some common issues. If your garage door does one of the following, then it’s probably time to adjust the limit switches:
- Over-travel: If the door opens too far or doesn’t close fully, it can become a security hazard.
- Reverses Unexpectedly: If your door starts to close and then suddenly reverses for no reason, that could signify a limit switch issue.
- Slamming: If the door comes crashing down, adjusting the limit settings can buffer that sudden stop.
By making these adjustments, you can extend the lifespan of your garage door opener and avoid costly repairs.
Gathering Your Tools
Before diving into adjustments, you’ll need a few tools. Here’s a simple list to have on hand:
- Screwdriver: A basic flathead or Phillips will usually do.
- Pliers: These come in handy for any stubborn screws.
- Step Ladder: To reach higher components without straining yourself.
- Owner’s Manual: This is your roadmap, detailing your specific model’s features.
Having your tools ready makes the process smoother and more efficient.
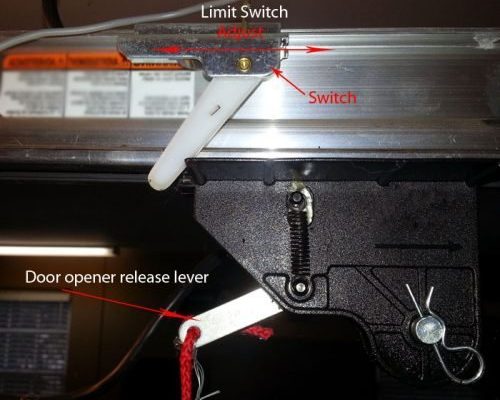
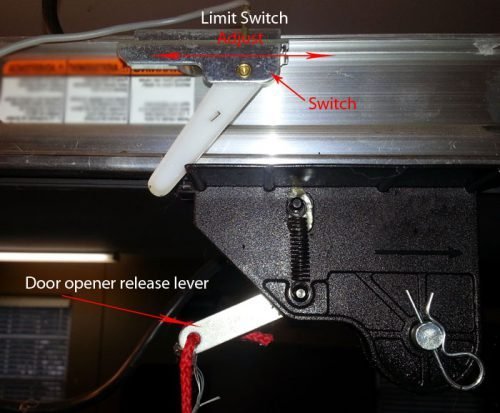
Locating the Limit Switches on Your Opener
Finding the limit switches can feel like a bit of a treasure hunt, but they’re usually located on the back or side of the garage door opener unit. If you have a Chamberlain or LiftMaster, look for a series of screws or buttons labeled “up” and “down.” Those are your limit switches in action.
On a Genie model, the switches are often near the motor or beneath a protective cover. Refer to your owner’s manual for exact locations, as different models can vary.
How to Adjust Limit Switches: Step-by-Step
Ready to make some changes? Here’s a simple breakdown of how to adjust the limit switches.
1. Prepare Your Garage Door:
– Make sure it’s fully closed. This helps identify how much adjustment is needed.
2. Locate the Switches:
– Identify which switch controls the upward and downward movement.
3. Adjusting the Up Limit:
– Turn the “up” limit screw or knob a quarter turn clockwise to make the door open higher; counterclockwise decreases the height.
4. Adjusting the Down Limit:
– Similarly, adjust the “down” limit screw. Clockwise increases the closing distance; counterclockwise reduces it.
5. Test the Door:
– After making adjustments, use your remote to open and close the door a couple of times. Watch closely to check for smooth operation and safety.
Repeat adjustments as necessary until you achieve the desired height and motion.
Common Troubleshooting Tips
Even after adjusting, you might encounter problems. Here are a few quick troubleshooting tips:
- Check the Remote: If it doesn’t work after adjustments, the remote may need new batteries or a reset.
- Inspect the Sensors: Dirty or misaligned sensors can obstruct proper function. Clean them gently.
- Look for Obstructions: If something is blocking the door’s path, that can interfere with limit switches as well.
Sometimes, the simplest solutions can clear up frustrating issues.
Why Proper Adjustment Matters
Getting the limits right is more than just convenience; it’s about safety and reliability. A properly adjusted garage door avoids unintended damage to your vehicle or garage and helps mitigate safety risks. Imagine your garage door crushing a box or, worse, a pet’s paw—preventive maintenance goes a long way!
Additionally, consistent performance can save you on electricity bills over time by ensuring optimal motor function.
When to Call a Professional
If you’ve followed these steps and are still experiencing issues, don’t hesitate to call a garage door technician. Sometimes, it could be a deeper issue with the garage door opener itself, or the limit switches might need complete replacement.
It’s better to invest in expert help rather than risk injury or further damage to your opener.
Understanding and adjusting garage door opener limit switches is a valuable skill for any homeowner. You don’t need to be a professional to keep your garage door running smoothly. By following the steps outlined here, you can tackle adjustments comfortably and confidently.
Remember, maintaining these settings helps ensure your door operates safely and efficiently, so revisit the limits every few months. And the next time you hear your garage door whirring to life, you can smile knowing you had a hand in making it all happen!