In this guide, we’ll walk you through the simple process of programming your garage door opener remote. Whether you’re using a LiftMaster, Chamberlain, or Genie model, the steps are straightforward. So grab your remote, and let’s dive in!
Understanding Your Garage Door Opener Remote
Before we get started, let’s take a moment to understand what your garage door opener remote actually does. At its core, this little device sends a coded signal to your garage door opener. When you press a button, your remote transmits a unique code, which opens or closes the door accordingly. It’s a secure way to ensure only you have access.
You might be wondering if all garage door remotes are created equal. In fact, they come in various shapes and sizes, and some are universal, meaning they can work with different brands. Knowing the type of remote you have will make programming easier and more efficient.
It’s also important to mention that programming often requires access to both the remote and the garage door opener unit. So, before you start, make sure you have your ladder handy in case the opener is mounted high.
Gathering the Necessary Materials
To program your garage door opener remote, you’ll need a few basic items:
- Your Garage Door Remote: Ensure it’s the right one for your opener.
- A Stepladder: This will help you reach the garage door opener, especially if it’s mounted high.
- Owner’s Manual: If you have it, this can provide model-specific instructions.
- A New Battery: If your remote isn’t working, the battery might need changing.
Having these items ready before diving into the process will make everything smoother. You don’t want to realize halfway through that you need a new battery or can’t reach the opener!
Locating the Learn Button on Your Garage Door Opener
The next step is to find the learn button on your garage door opener. This small button is usually located on the back or side of the opener, beneath a light cover or next to the antenna. It’s typically colored yellow, red, or green, depending on the brand.
Here’s where it gets a bit fun: imagine that learn button is like a secret handshake for your remote and opener. When pressed, it allows the two devices to communicate. You may need to climb onto a ladder for a better view, so be cautious!
Once you locate it, keep in mind that pressing this button will erase any previously programmed remote controls. So, if you’ve got other remotes you want to keep, make sure they’re out of reach before proceeding.
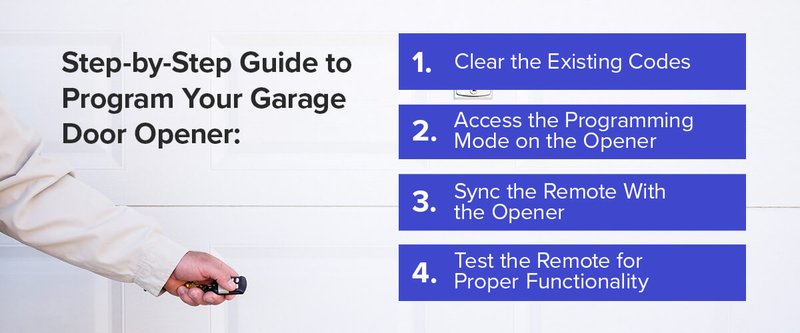
Programming the Remote: Step-by-Step
Now that you’re set with the right materials and know where the learn button is, let’s get to the heart of the matter. Here’s how to program your garage door opener remote:
1. Press the Learn Button: Begin by pressing the learn button on your garage door opener. You should see a light illuminated, indicating it’s in learning mode.
2. Press a Button on the Remote: Within 30 seconds, press and hold the button you want to program on your remote. This tells the opener which button you want to link.
3. Look for Feedback: After a few seconds, you should notice the light on the garage door opener blinks or turns off. This confirms your remote has been successfully programmed.
4. Test the Remote: Climb down and give the button a press. Watch how the garage door reacts—if it opens or closes, you’ve done it right!
If it doesn’t work, don’t worry. Sometimes it takes a couple of tries to get it just right. Just go back and press the learn button again, and repeat the steps.
Changing the Remote Battery
If your remote isn’t working at all, it might just need a battery change. Here’s how to do it:
1. Open the Remote Case: Use a small screwdriver to gently pry open the case. Most remotes have a slot for easy access.
2. Remove the Old Battery: Take out the old battery and check its size. Most garage remote batteries are 3V and look like coin cells.
3. Insert the New Battery: Place the new battery in the same orientation as the old one (usually, the positive side faces up). This is crucial for it to work!
4. Close the Remote Case: Snap the remote back together and give it a test run to see if it works.
If you run into issues, it might be wise to check if the battery is installed correctly or to replace it with a fresh one—sometimes those “new” batteries can be old stock!
Troubleshooting Common Issues
Even with the best preparations, sometimes things go awry. Here are some common problems and how to resolve them:
– Remote Not Responding: Double-check that the battery is installed correctly and that it’s not dead. If the remote doesn’t light up or respond, replacing the battery might be needed.
– Light Blinks but Door Doesn’t Move: If the light on your opener blinks, but the door doesn’t open, the remote may not be synced correctly. Follow the programming steps again to ensure they are paired.
– Signal Issues: If your opener only works intermittently, there might be interference from nearby electronics. Try moving closer to your opener to see if it’s a range issue.
Remember, troubleshooting might feel frustrating. Every issue has a solution, and sometimes taking a break helps you come back with fresh eyes!
Understanding the Importance of Security Codes
One of the neat aspects of garage door openers is their security features. Each remote typically operates with a unique security code that syncs with your opener. This is why it’s important to keep your remote secure and private—losing it could give someone unwanted access to your home.
When programming a new remote or resetting one, you may want to consider changing the security code to boost your home’s security. This usually requires following programming steps specific to your opener model, which you can find in the owner’s manual.
Exploring Universal Garage Door Remotes
If you’re looking for something more versatile, a universal garage door remote might be your answer. These remotes can work with various brands, making them a great choice if you have different types of garage door openers or multiple doors to manage.
The advantage here is convenience—you won’t have to juggle multiple remotes anymore! Just program the universal remote using the same steps we just went through, and you’re set.
However, keep in mind that you may want to check compatibility with your specific garage door opener brand. Some setups may have restrictions, so it pays to do a little homework before purchasing.
Maintaining Your Garage Door System
Keeping your garage door system running smoothly is essential for longevity and convenience. Here are a few maintenance tips to consider:
– Regularly Test the Remote: Make it a habit to test your remote every few months. This ensures everything is functioning correctly and helps catch any issues early on.
– Inspect the Garage Door Mechanism: Check for any wear or damage to springs, tracks, and rollers. Keeping these parts in shape will prolong the life of your garage door system.
– Lubricate Moving Parts: Applying a suitable lubricant to the moving parts can reduce noise and wear, ensuring a smoother operation.
By being proactive with maintenance, you can avoid unexpected surprises and keep everything running like a well-oiled machine.
Final Thoughts
Programming your garage door opener remote may seem tricky at first, but with a little guidance and patience, you’ll find it’s quite manageable. Once you know how to program your garage door opener remote, you’ll appreciate the convenience it brings every time you come home.
With your remote properly synced, you can enjoy the little things—like rolling into your garage with no fuss. So, the next time your remote goes silent, you’ll be ready to tackle programming with confidence. Happy opening!
Originally posted 2025-03-03 09:37:13.