Most residential garage door openers, like those from Overhead Door, use a circuit board to communicate with your remote control. This little board acts as the brain of your garage door system, translating the signals from your remote into actions—like opening or closing the door. If you’ve ever felt frustrated manually opening a heavy garage door, you’ll be thrilled to learn how to program your circuit board, bringing convenience back to your life.
Understanding Your Overhead Door Circuit Board
Your circuit board is the heart of your garage door opener. It controls everything from the motor to the remote signals. Imagine it as the conductor in an orchestra, making sure each piece (the door, the motor, and the remote) harmonizes perfectly. Most Overhead Door models come with a basic circuit board that includes a few key components:
- Power Supply: This provides the necessary voltage to operate the entire system.
- Receiver: This part picks up signals from your remote.
- Relay: It acts like a switch that controls the motor’s actions.
If any of these parts start acting up, your garage door may not respond to your remote. Knowing how all these pieces work together is crucial before diving into programming.
Gathering Your Tools
Before you jump into programming, make sure you have everything you need. Think of this step as gathering your ingredients before baking a cake. It saves a lot of time and hassle later. Ideally, you’ll want:
- A compatible remote control
- A ladder (for accessing the circuit board)
- A small screwdriver (for opening the circuit board cover)
- Your owner’s manual (if available)
For instance, if you have a multi-button remote from Overhead Door, knowing how to reset or reprogram it can be a game-changer. Often, the manuals will provide specific instructions for your model, like how to sync the remote with the circuit board.
Steps to Program the Circuit Board
Alright, let’s get into the real meat of the topic: programming the overhead door circuit board. This section will guide you through the steps with clarity, so no detail is missed. Remember, don’t rush through; take it one step at a time.
1. Power Down the System: Safety first! Unplug your garage door opener from the power source. This prevents any accidental activates while you’re working.
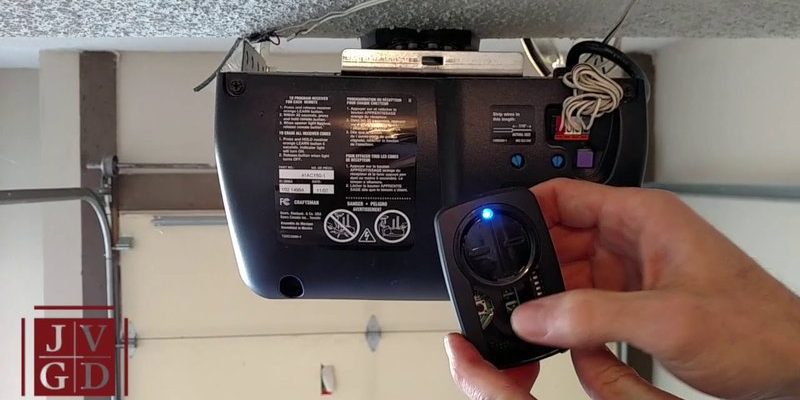
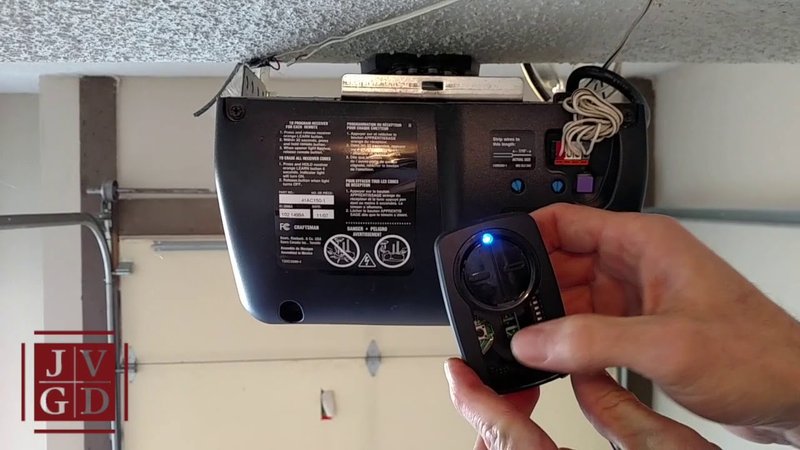
2. Access the Circuit Board: Use your ladder to reach the circuit board. You may need to remove a cover, which is often secured with screws. Keep these screws safe—you’re going to need them later!
3. Locate the Program Button: Look for a button on the circuit board—this is often labeled as “Learn,” “Program,” or something similar. Press this button; you should see a light turn on or flash, indicating it’s ready for programming.
4. Prepare Your Remote: Now, take your remote control and press the button you wish to program while the light on the circuit board is on. You should hear a click or see the light blink, confirming that your remote is now paired with the circuit board.
5. Finish Up and Test: Once your remote is programmed, screw the cover back on, plug the unit in, and give it a test. Press the remote button to see if the door responds.
Troubleshooting Common Issues
Sometimes, even the best-laid plans run into snags. If your garage door opener isn’t responding after programming, don’t panic! Here are some common issues and how to address them:
- Remote Not Pairing: Ensure the remote is compatible with your circuit board. Some remotes only work with specific models.
- Battery Problems: Check your remote’s battery. A weak battery can prevent proper programming. Just like using a phone with a dying battery, it won’t work right.
- Reset the System: If it still doesn’t work, try resetting the circuit board. This often involves holding down the learn button until the light turns off and then repeating the programming steps.
Think of troubleshooting as a detective story. Seek out clues and eliminate the obvious suspects until you find the culprit preventing your door from opening smoothly!
Additional Tips for Success
To make your programming journey smoother, here are a few extra tips.
– Read the Manual: Every model has its quirks. The owner’s manual can provide invaluable insight specific to your circuit board.
– Label Remote Buttons: If you have multiple remotes or buttons, label them. This helps avoid confusion later on!
– Consider Universal Remotes: If you’re looking for flexibility, universal remotes can work with different brands. Be sure to check compatibility first.
Programming your overhead door circuit board should become second nature after a couple of tries.
Programming your overhead door circuit board opens up a world of convenience. Once you’ve got the hang of it, the process feels like a walk in the park—perhaps even as easy as turning on your favorite streaming service. Just remember, take it slow, follow your instructions, and don’t hesitate to troubleshoot when things don’t go as planned. You’re not just programming a remote; you’re securing your home and enhancing your daily routine. With a little bit of effort, you’ll be back to effortlessly opening and closing your garage door in no time!