Programming these sensors may seem daunting, but don’t worry—it’s easier than you might think. In this guide, we’ll break down the steps clearly, so you’ll feel confident getting your garage door safe and sound again. Grab a cup of coffee, and let’s get started!
Understanding Chamberlain Safety Sensors
Before diving into the programming steps, let’s understand what these safety sensors do. Chamberlain safety sensors are designed to detect any objects in the path of the garage door, preventing accidents that could occur if, say, a child or a pet were to wander underneath while the door is closing. Each sensor works by sending an invisible beam across the door’s opening, like a safety net.
Here’s the thing: if there’s any break in that beam, it tells the garage door to stop or reverse. This is critical, as it can prevent injury and ensure that nothing gets damaged. Trust me; you want these sensors functioning properly.
Typically, Chamberlain safety sensors are located on either side of the garage door. They might appear small and inconspicuous, but they play a significant role in your home safety. If these sensors aren’t synced or programmed correctly, your garage door might operate erratically—think random stopping or not closing at all.
Gather Your Tools
You’re going to need a few basic items to begin programming your Chamberlain safety sensors:
- Step Ladder: If your door is tall, a ladder will make it easier to access the sensors.
- Screwdriver: Depending on how securely your sensors are mounted, you might need a screwdriver to make adjustments.
- Fresh Batteries: If your remote has been acting up, it’s wise to replace the batteries first.
- Chamberlain Lifting Remote: We’ll need this remote for programming.
Before you start, ensure that your garage door is closed. This keeps everything stable and helps you focus on the task at hand.
Locating the Safety Sensors
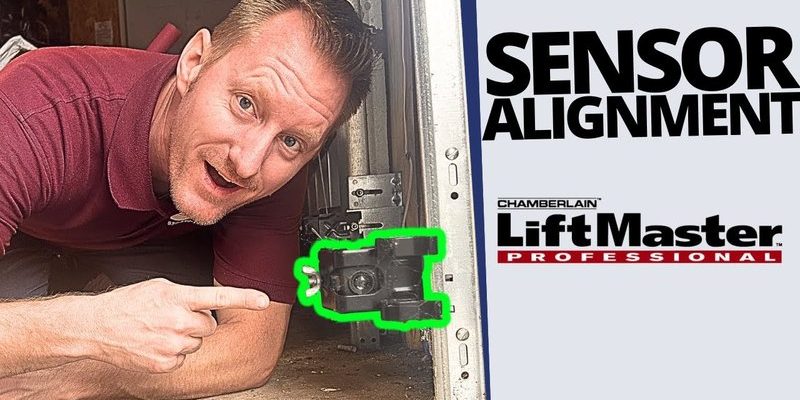
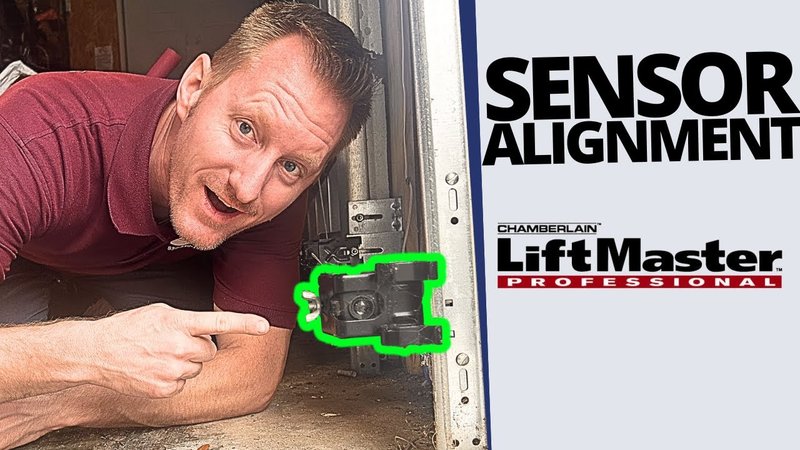
Next up, let’s find those sensors. They’re typically installed about six inches off the ground on either side of your garage door. The sensors are small, rectangular, and usually mounted on brackets or attached to the wall.
Now, here’s a handy tip: look for a green light on one sensor and a red light on the other. The green light indicates that the sensor is working properly, while the red light signals that something might be wrong. If the red light is flashing, you’ll need to troubleshoot before programming.
To access them, you might need that ladder. Stand safely on it and inspect each sensor for signs of damage, misalignment, or dirt. Even a thin layer of dust can interfere with their operation—so give them a gentle cleaning if needed.
How to Program Your Chamberlain Safety Sensors
Now it’s the moment of truth! Programming the safety sensors on your Chamberlain garage door opener is straightforward. Follow these steps closely:
1. Turn Off Power: First, make sure to unplug your garage door opener. This is an important safety measure.
2. Check Sensor Alignment: Confirm both sensors face each other directly. If they’re misaligned, adjust them until the red and green lights remain steady.
3. Reconnect Power: Plug your garage door opener back in. Listen for sounds from the motor—it’s a good sign that everything is back on track.
4. Press the Remote Button: Now, grab your Chamberlain remote and press the button to open or close the door. Wait and observe if the door functions properly and that the lights on the sensors reflect a steady green.
If the door operates smoothly, congrats! You’ve successfully programmed your Chamberlain safety sensors. If not, let’s take a look at what might be causing the issue.
Troubleshooting Common Issues
If the sensors aren’t functioning as expected, don’t panic. Here are a few troubleshooting tips:
– Check Power: Make sure the unit is powered on. If it’s not, double-check your outlet and any extension cords you may be using.
– Inspect Wiring: A loose connection could cause the sensors not to sync. Ensure the wires are tight and free from damage.
– Test the Sensors: Block one sensor at a time. If the door doesn’t reverse or the lights don’t change, there’s likely a malfunction.
– Reset the Motors: Sometimes, resetting the garage door motor can help. Unplug it for about a minute, then plug it back in.
If these steps don’t work, you might want to consult the manufacturer’s customer service for assistance or review the user manual for more specific guidance.
Maintaining Your Safety Sensors
Once you have everything programmed and working, the last step is maintenance. Just like you wouldn’t ignore the oil change in your car, your safety sensors also need a little love now and then.
– Regular Cleaning: Dust the sensors every few months to avoid interference. A damp cloth is usually enough.
– Check for Alignment: Every once in a while, inspect them to ensure they’re still aligned correctly.
– Battery Maintenance: If you notice issues with your remote, replace the batteries regularly. It’s an easy fix that can save you a headache.
Taking these preventative steps ensures that you won’t run into problems later on. Plus, it’s a quick task that goes a long way toward keeping your garage door functioning smoothly.
Programming the Chamberlain safety sensors might seem like a hefty task at first, but it breaks down into manageable steps. By following the guidelines above, you can ensure your garage door opener stays functional and your home remains safe. So next time you step out or come back home, you can do so with peace of mind—knowing that those tiny sensors are doing their job.
Whether you’re a DIY enthusiast or just looking to ensure your garage door safety, remember that a little care goes a long way. Don’t hesitate to contact a professional if you hit a snag; safety should always be your top priority!