Liftmaster has a reputation for reliable garage door openers, and their control panels are designed to make your life easier. But like any tech, knowing how to program it is key to unlocking its full potential. Think about it this way: it’s like learning to use your smartphone. Once you know the basics of operating it, everything else flows more smoothly. So, let’s dive in and get you set up!
Understanding Your Liftmaster Control Panel
Before jumping into programming, let’s familiarize ourselves with the Liftmaster control panel. Usually mounted on the garage wall, it features buttons for opening and closing the door, as well as lights and other functions. Understanding how the different parts of the control panel work will help you in programming it.
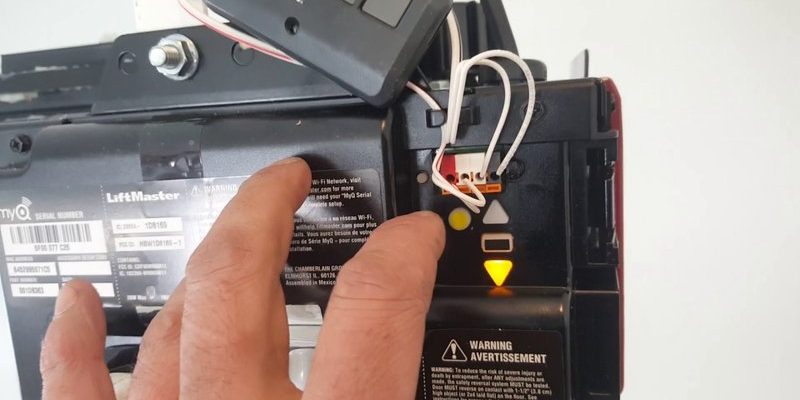
One of the important components is the “Learn” button, usually located on the back or side of the motor unit. This button plays a critical role in syncing your remote. When you press it, the opener enters a *learning mode*, allowing it to recognize new remotes or keypads. Imagine it as an inviting conversation starter; it says, “Hey, I’m ready to connect!”
Another key feature of the control panel is its display screen. It shows various indicators, including diagnostic tools if something goes wrong. If you see a blinking light, it could indicate that the battery needs replacement or that something needs troubleshooting. Knowing what the different lights and symbols mean can save you a lot of time and confusion.
Gathering What You Need
Before you begin programming the Liftmaster control panel, make sure you have everything you need at hand. Missing tools or batteries can delay the process and make it more frustrating than it needs to be.
You’ll need:
- Your Liftmaster remote control
- Access to the Liftmaster control panel
- New batteries if your remote is low on power
Let’s not forget that a comfortable setting is also crucial. Finding a quiet area in your garage will allow you to focus without distractions. You might also want to refer to your Liftmaster manual for specific details about your model—each one can have unique programming instructions.
Once you’ve got everything gathered, you’re ready to start the programming process!
Programming Your Liftmaster Remote Control
Now, let’s get to the fun part: programming your Liftmaster remote. Here’s a simple, step-by-step guide to syncing it with your control panel. Follow these steps carefully:
1. Locate the “Learn” Button:
– Stand on a ladder or step stool if needed, and locate the “Learn” button on the motor unit. It’s usually near the antenna wire.
2. Press the “Learn” Button:
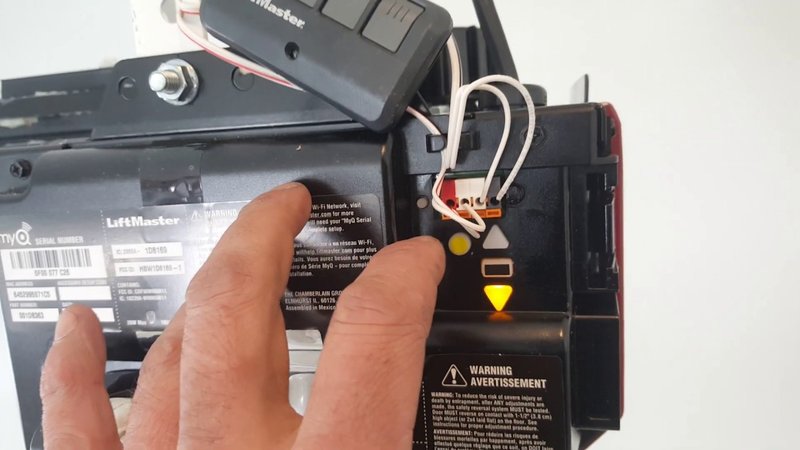
– Press the button until you see a light turn on. This means the control panel is ready to learn a new device. It usually stays lit for about 30 seconds!
3. Activate Your Remote:
– While the light is still on, press and hold the button on your remote that you want to program. You should see the light on the control panel blink and then turn off, indicating successful programming.
4. Test the Remote:
– Try using the remote from a distance. If the garage door opens or closes, you’ve done it! If not, repeat the steps, ensuring that you hold the remote firmly.
Remember, if you have multiple remotes to program, repeat the process for each. Each one needs to be added individually, just like inviting friends to a party—everyone needs their own invite!
Using the Liftmaster Keypad
If you have a Liftmaster keypad and want to program that as well, the process is slightly different, but no less straightforward. The keypad allows for key code access, which is handy if you don’t want to rely solely on remotes.
Here’s how to set it up:
1. Access the Learn Button:
– Just like when programming the remote, you’ll want to access the “Learn” button on the motor unit.
2. Press the Button:
– Press it until the light comes on, signaling it’s ready to learn a new device.
3. Enter Your Desired Code:
– On your keypad, enter the 4-digit code that you wish to use. It can be any combination of numbers (try to avoid obvious ones like “1234” for security reasons).
4. Finalize the Code:
– Press the “Enter” button on the keypad. You should see the light on the control panel blink off—this means the code is successfully programmed.
5. Test the Keypad:
– Climb back down and try entering your code on the keypad to see if it opens the garage door. If it does, congratulations—you’re all set!
Understanding how to program the Liftmaster control panel and its connected devices makes your garage more secure and as simple to access as the front door to your house.
Troubleshooting Common Issues
Even with the best instructions, issues may arise while programming your Liftmaster control panel. Here are some common hiccups and how to fix them:
– Remote Not Syncing: If your remote isn’t connecting, first check the batteries. Weak batteries can often lead to failure. Next, ensure you’re within the range of the opener while pressing the remote.
– Keypad Won’t Accept Code: If the keypad won’t accept your new code, you might need to reset it. To reset, press and hold both the “†” and “0” (or ”
– Flashing Lights on Control Panel: If you see continuous flashing lights, it could indicate a safety issue. Check to ensure there are no obstructions blocking the sensors.
Here’s the thing: troubleshooting can be trying, but a little patience goes a long way. Most issues can be resolved quickly with a bit of trial and error.
Why Proper Programming Matters
You might be wondering why all this fuss about programming is necessary. Well, proper programming ensures that your garage door operates smoothly, securely, and reliably. Your Liftmaster system is designed for convenience, but if it’s not synced correctly, you can run into potential problems.
Insecure programming can leave your garage vulnerable to unauthorized access. Think of it as locking your front door with a flimsy lock—it’s just not reassuring. Plus, navigating a malfunctioning control panel can be frustrating. Proper programming minimizes these risks and maximizes your system’s effectiveness.
It’s like ensuring that your car’s GPS is up-to-date; you want to avoid the stress of getting lost or running into roadblocks.
Programming your Liftmaster control panel might seem daunting at first, but once you break it down, it’s not so bad—like baking a simple recipe. You gather your ingredients (equipment), follow the steps, and enjoy the results. With these steps, you’re now equipped to sync your remotes or keypads, making garage access a breeze.
Remember, proper programming enhances security and gives you peace of mind, ensuring that your Liftmaster system works smoothly for years to come. So go ahead and give it a try—your garage door is waiting!